Free Labeling |
  
|
Free Labeling |
|
The Free labeling tool supports labeling of point, line and polygon objects with content from the feature defined by a search result.
Also see chapter Search result for details.
Note: A defined search result restricted for free labeling is needed.

Layer query - search result restriction for "Free labeling"

Free labeling - WebOffice category
Property |
Description |
Use tool? |
Specify whether this Tool is available in the WebOffice client (Yes) or not (No). |
Target layer for labeling |
Specifies the default labeling layer. If a default labeling layer is specified, that layer will be used by default to open the free label tool. Note: The WebOffice 10 R3 Client must be chosen and set explicitly, in the labeling option is set to "no". |
Multilayer labeling |
Defines if field names should get used (Yes), or if only field values (No) should get displayed in the labelling text. |
Use Fieldnames? |
Defines if field names should get used (Yes), or if only field values (No) should get displayed in the labeling text. |
Splitter |
Split character, that gets used as divider between the single field values. Empty configuration (default) means a single whitespace character. |
Font |
Font for Markup text. Note: Internet Explorer (all versions) does not consider configurations for Markup text. |
Font style |
Font style for Markup text. Note: Internet Explorer (all versions) only supports font style "regular" and "bold". |
Text size |
Default text size (font size). |
Text color |
Color of Markup text. |
Background color |
Text background color. |
Line width |
Line width of the base line in pixels. |
Line color |
Color of the base colour. |
Show style dialog? |
Specifies whether the Labeling Options dialog is visible (Yes) in the tool form or not (No). |
Show fields dialog? |
Specifies whether the available lable fields section is visible (Yes) in the tool form or not (No). |
Tool free labeling - WebOffice category
Free labeling tool in WebOffice 10 R3 client

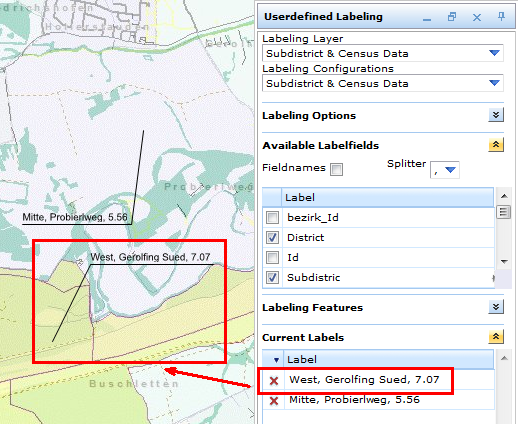
Tool form 'Free Labeling' in WebOffice 10 R3 HTML client
The labeling theme (layer name) and labeling configuration (name of the specified search result) can be selected, adjusted and set in the Free (User defined) labeling tool form.
•Labeling Options
The predefined style options can be changed in the labeling options as well.
•Available Labelfields
The user can select single or multiple fields, which ought to be used for labeling (i.e. content related or field name). In addition, the user can choose to insert a splitter as separator for multiple information content (i.e. a comma, dot, hyphen, and slash). Prior configuration in the project setup is necessary (i.e. in WebOffice author) to have the actual search result appear and listed. The field order may be changed using the context menu.
Note: The separator '\n' separates the attributes via line break so that each attribute is in a new line. Labeling features of an ArcMap relate or a WebOffice relate with the separator '\n' is not possible. In this case the separator will be ignored.
To label a feature, the user can click on the desired location (i.e. point or area of interest). A leader line with the feature details will appear. The information can now be placed anywhere in the map by simply double-clicking on the wanted location for the label.

Placing the free labeling text with leader line
WebOffice Relates as well as ArcMap Relates are supported by 'Free Labeling'. To get structured and clear results for 'Free labeling' with relates, please consider the suggestions in chapter JOIN/RELATE. This chapter also shows you how to define the order and visibility of the result fields.

Free labeling with relate
•Labeling Features
If several object/multiple features of the same theme are selected, the related objects or features are listed in the Labeling Features window. The user can select an entry by clicking on it to place the label into the map accordingly.

Labeling features
The user can select and view all features of interest in a separate box/window to be displayed in the labeling window. To set up the window accordingly, the user can select the option to display "Visible Layers" in the Labeling Layers. Each feature appearing in the box can be selected and zoomed to by double-clicking on its description.

Current label selection
•Current Labels
The information of each label placed will also show in the Current Labels tab in the Labeling tool window. By selecting an entry, the selected label/feature will be highlighted in the map and can then be removed.
By using the print button, the print tool form will open. Free labels and markups will be included in the output.
Note: The print tool will only work if the tool is configured and setup in the WebOffice 10 R3 beforehand.
See chapter Printing and Print for configuring the print tool.
If the user wants to reuse the placed labels in future sessions, he can use state IDs. This can be done in two ways:
•Sending a hyperlink including the state ID to a specified mail address using the Send by e-mail button of the Free labeling tool form, or the Add red-lining tool form (also see chapter Meeting Point)
•Adding the current website to the users favorites can be done by using the Favorites/Bookmarks tool (see chapter Favorites/Bookmarks).
Note: To label multiple objects from several layers for the printout, it should be easier and more be effective to use Simple thematic mapping (see chapter Simple thematic mapping). The style with labels for the whole layer can be define accordingly.
In order to save the label settings on the client-side (chosen label configuration per layer, field order and splitter), the user must safe his user profile.
Note: If you want to change the pixel tolerance for free labeling it is possible to use the attribute Pixel tolerance for Identify in WebOffice Defaults.