Wizard Steps |
  
|
Wizard Steps |
|
Below you will find detailed information for each of the wizard steps.
Wizard step |
Description |
Starting the Wizard |
 Start the Create WebOffice project wizard
|
Step 1 |
•Provide a Project ID for uniquely identifying your project. A WebOffice 10 R3 project is started in the browser providing the Project ID as URL parameter (e.g. project=MyWebOfficeProject). The project configuration file name will be identical to the Project ID. Project configuration files have the file extension .xml,
•Provide a Project name for display and browser window title,
•Set the User view to
oMap centric: -Scope: Typical WebOffice 10 R3 Standard project with full functionality for power-users.
-Panels and tool dialogs: Full panel and tool dialog control. Storable in user profiles.
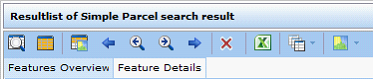
-Result list: Full Result list options:
oMap centric basic: -Scope: Typical easy-to-use WebOffice 10 R3 Basic project with functionality for casual users. No GUI modifications will be provided to the user.
-Panels and tool dialogs: No panel and tool dialog options – no user profile storage.
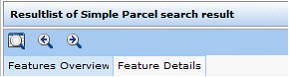
-Result List: Only next, previous and zoom to all buttons available. No context menu, no multiple search result views.
oData centric: -Scope: WebOffice 10 R3 project focusing on data analysis and not on mapping.
Note: User view Data centric will not take effect in this property. When choosing this option Map centric will be used. For creating a Data centric project please contact web-support@mysynergis.com.
•Set User and Password if you want to provide simple access restriction to your WebOffice 10 R3 project •Click Next.
 Create WebOffice project wizard - Step 1
|
Step 2 |
In input field Server enter the host name of the server machine, where ArcGIS Server Standard runs on. Press the Get services button for retrieving the map services served by ArcGIS Server. Choose the right map service from Available services (the currently opened ArcMap document and the chosen map service should correspond to each other, i.e. the map service should have been published with the currently opened ArcMap document). Choose from Dataframes the data frame you primarily want to use for map display and queries, Click Next.  Create WebOffice project wizard - Step 2
If you start creating your WebOffice 10 R3 project locally (without available connection to ArcGIS Server) then you check the ‘Work without ArcGIS Server connection’s check box.
 'Work without ArcGIS Server connection' check box in WebOffice author wizard - Step 2
|
Step 3 |
The two mandatory field Service user and Password need to be populated with a valid ArcGIS Server user account (member of local user group agsusers on the ArcGIS Server Standard machine). These user credentials are necessary for communicating with ArcGIS Server. The Map service name will be displayed in the client and is optional. If you do not specify it then the ArcGIS Server service name will be used. Tip: Leave ‘Use all data frames’ checked if you want to use all data frames of your map document at some time in the project life cycle. Uncheck the checkbox only if you never will use any other then the data frame selected in step 2. Click Next.  Create WebOffice project wizard - Step 3
If you have checked 'Work without ArcGIS Server connection' check box in Step 2, then you can manually enter the ArcGIS Server connection parameters – no live connection to ArcGIS Server is needed at this point of time.  Manually enter ArcGIS Server connection parameters in WebOffice author wizard - Step 3
|
Step 4 |
Specify the ArcGIS Server service used for generating selection graphics. This service should already be available because it gets created once during initial configuration (there it is recommended to name the map service SynMapService). For more details please refer to WebOffice 10 R3_GettingStarted.pdf. Press the Get services button. Choose the service named SynMapService from the list. Check that Service user and Password values are set. Click Next.  Create WebOffice project wizard - Step 4
|
Step 5 |
Specify the ArcGIS Server service in order to generate the print service for maps. The service should already be available and was most likely set-up during the initial installation and configuration process of the WebOffice 10 R3 software. The settings for the service were most probably set-up as SynPlotService during the softwares installation process. Further datails are available in WebOffice 10 R3_GettingStarted.pdf Press the service button to open Services. Select the SynPlotService from the list Check whether all fields for Service-User and Password are filled in. Click Next.  WebOffice 10 R3 Assistent ‚Erstellen eines Projektes‘ - Schritt 5
|
Step 6 |
Check Overview map if you want to have an overview map in your WebOffice 10 R3 client. The map selected in step 2 is used as Overview Map by default. Note: If you want to use an Overview map but not the map service selected in step 2, then click the Edit button and e.g. change the data frame property.  Overview map properties
Check the box North arrow to include and display a the arrow on the map. Instead of keeping the default option for the North arrow style, the user can Edit its properties by clicking on the Edit button.  North arrow properties
Check Scale bar if to display a Scale bar in the map. To change the Scale bar display style, click Edit to change the Scale bar properties.  Scale bar properties
Check the box in front of the Copyright option to display a Copyright entry in the map. To neglect the default Copyright style, click Edit to set the Copyright text and change the properties.  Copyright text and properties
Check Use ArcMap Table of content (TOC) to add a Table of content control in the WebOffice 10 R3 client. Uncheck Use ArcMap Table of content (TOC) no to include Table of content control in the WebOffice 10 R3 client at all. Click Next.  Create WebOffice project wizard - Step 6
|
Step 7 |
WebOffice author shows the summary of the wizard. Click Save Project to save the project to the file system.  Create WebOffice 10 R3 project wizard - Step 7
|
WebOffice author 'Create WebOffice project' wizard steps