Install WebOffice Extensions |
  
|
Install WebOffice Extensions |
|
Note: Depending on your server scenario, there are two ways to install the WebOffice Extensions:
1.The setup incl. the ArcGIS Engine has only to be installed on server machines without ArcGIS Desktop or ArcGIS Engine. In that case please download the corresponding setup here.
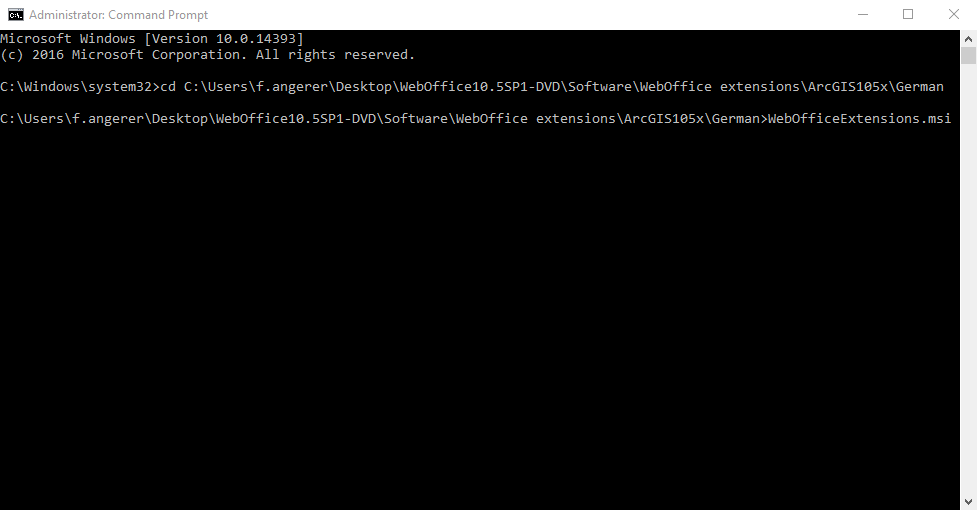
2.For all other scenarios the WebOfficeExtensions.msi from WebOffice10.5-DVD\Software\WebOffice extensions\ArcGIS10xx\English\WebOfficeExtensions.msi has to be used.
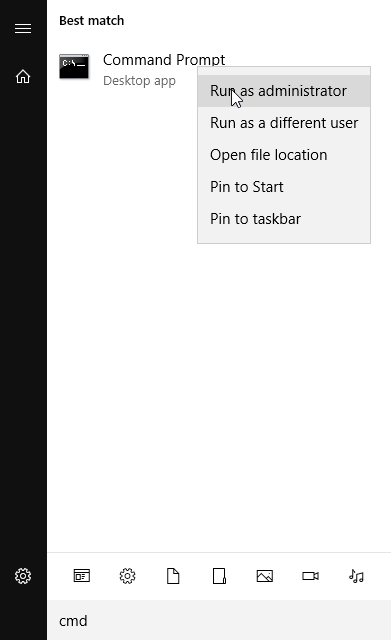
Important Note:
•The WebOfficeExtensions.msi has to be executed as administrator because it creates registry keys for the ArcGIS Engine. In order to do this run the command prompt as administrator and start the WebOfficeExtensions.msi with the command prompt.
Note: If you experience troubles installing the setup you can log the installation steps using the msiexec -i installation functionality. See chapter Install/Uninstall Problems during Setup Process for details how to log the setup process.
Note: Dependent on your server machine the installation process of the WebOffice extensions 10.5 SP2 might use more time (about 20 minutes) as usual. We recommend to wait for a successful end of the installation and not to cancel the installation at an early stage.
Note: It is recommended to create an own user (local or domain user) before executing the setup. This user will be specified during the setup process of the WebOffice extensions 10.5 SP2
If data that originates from a network drive is involved in printing, it is highly recommended to create a domain user for the WebOffice extensions 10.5 SP2 that has access rights to this network.
Note: If there are problems with the printing time, it is assumed that the WebOffice extensions 10.5 SP2 user does not have the rights to use the 'Performance counter' / 'Performance editor'. In this case you have to add the WebOffice extensions 10.5 SP2 user to the group 'Performance Log Users'. For more details see chapter Add extension user to group 'Performance Log Users'.
Depending on your server scenario (see note above) download in the first step the corresponding WebOffice extensions 10.5 SP2 installation file here or use the setup from WebOffice10.5-DVD\Software\WebOffice extensions\ArcGIS10xx\English\WebOfficeExtensions.msi. Please use for entering the download page the same login data as used for the download of the WebOffice10.5-DVD. On the download page navigate to WebOffice extensions and select the installation file corresponding to your system:
•Choose the language of the installation file: English or German
•Choose the WebOffice Version
•Choose the ArcGIS Version

Download the corresponding installation file
Note: If you don't have any or only a bad connection to the internet, download the installation file in advance.
Note: It is recommended to create an own user (locale or domain user) before installing the WebOffice extensions 10.5 SP2. This user can be used for the installation process. To create a new local user account, open the node Local Users and Groups in the management console and right-click on User -> New User...
Before you can start installing the WebOffice Extensions, you have to copy some files first. Go to WebOffice10.5-DVD\Software\WebOffice directories\ and copy the following folders to <ArcGIS Server location>\directories\. By using a subdirectory of the <ArcGIS Server location>\directories it is ensured that the file system rights for accessing the folders are correctly set:
Mandatory:
•ServiceDocuments - used for saving your MXD documents. This way, you always know where to find your service documents. Skip copying this folder, if it has already been created in the course of the configuration of a data exchange path.
•WebOfficePlotTemplates - used for saving your plot templates (file extension .layout) and the SynPlotService.mxd that is used in the printing process.
•WebOfficeDataShare - used for saving data which has to be processed by the SOE in order to avoid memory heaps. Skip copying this folder if it was already created during Configure WebOfficeDataShare.
Note: In use of an Oracle database or client the user of the WebOffice extensions 10.5 SP2 have to be granted access to the file tnsnames.ora. The access rights have to be applied accordingly.
Optional:
•WebOfficeePaperTemplates - used for saving your WebOffice ePaper templates and the SynePaperService.mxd that is used in the ePaper generating process.
•WebOfficeExport - used for saving all data relevant to WebOffice extract server. Copy it if you plan to use WebOffice extract server.
In the next step execute the downloaded WebOfficeExtensions.exe and agree the license terms and conditions.

WebOffice extensions 10.5 SP2 license agreement

WebOffice extensions 10.5 SP2 setup
After the license agreement was confirmed and the installation type was specified, a wizard window for the WebOffice extensions 10.5 SP2 set up will be displayed.
Here a WebOffice extensions 10.5 SP2 user must be defined. This can be a domain user or a local user.

Installation with a local Windows user
In case of a Installation with a Domainuser, the user must be named like following: [DOMAINNAME]\[User].

Installation with a WebOffice extensions 10.5 SP2 Domain user
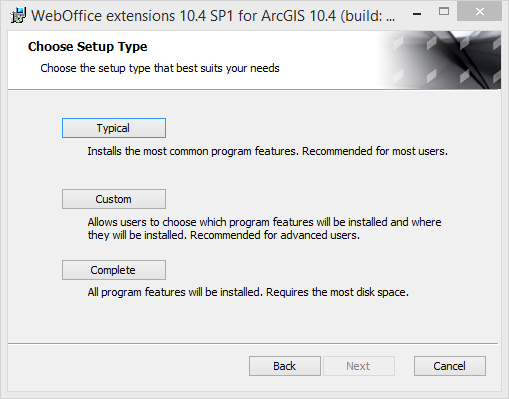
In the following step you can choose between different installation-types - Typical, Custom and Complete.
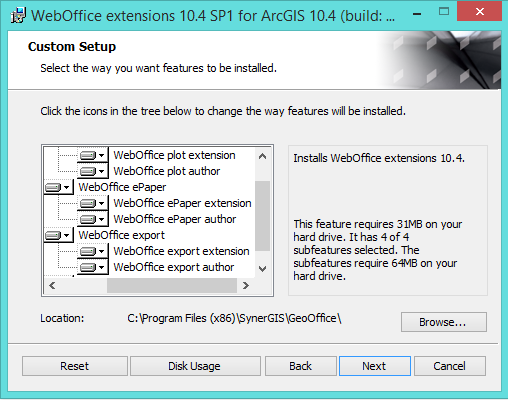
Using the Custom-choice you can define, which Extensions-components should be installed on your computer. Depending on your licensed modules (Plot, ePaper, Export) you are able to select the specific extension functionality respectively the author.
Note: If you are using a distributed scenario and you have to install only the extensions-authors on the administrative computer, please select the needed author-components and deselect the extensions.
Note: The user permissions for the directories can only be set correctly for single server system. For distributed server environments, the permissions on the directories must be set manually after the installation.
Note: By default provides the directories from the drive having the most disk space. Please adapt the paths corresponding your installation directories.
Note: All components of WebOffice extensions 10.5 SP2 will be installed to C:\ProgramFiles(x86)\SynerGIS\GeoOffice, by default.
If the components of the WebOffice extensions 10.5 SP2 will be installed to another directory than the default, keep in mind that you also have to install possible GeoOffice modules to this directory.
Note: The path to the configfile for WebOffice extensions 10.5 SP2 SynerGIS.WebOffice.Extensions.exe.config can be found in C:\Program Files (x86)\SynerGIS\GeoOffice\Bin. In this configuration the IP-address of the server with the Extensions, the Port, the max. Threads and the max. connections can be defined.
Note: If a server restart is indicated after the extension setup has been executed, it must be carried out. In this case, certain resources (dll files, fonts, etc.) were in use during the execution of the setup. If the restart is not carried out, problems can occur with fonts for example.