Ribbon Menu |
  
|
Ribbon Menu |
|
The Ribbon Menu of the project center contains several information or functions with regard to the WebOffice core Client.
Queries
The predefined Queries in the project are provided in WebOffice core Client by default in the Queries tab of the stack menu. The Queries can be specified as required in two different layouts (compact search - drop-down list and grouped search list). The required search information (search levels, type of search) is built up depending on the selected Query in the stack menu. For the Queries, the input can be made either via a text input field, a drop-down list or a value list with auto-completion.
Furthermore, the user has the possibility to configure a one-click Query or the integration of external data within a Query (e. g. ESRI World Geolocator) in a WebOffice core client project. In addition, various search modes are available for the user (New Result with map update(zoom), New Result with map update (pan), New Result, Add to Result or Remove from Result). The Reset Query Fields button enables the user to delete all values in the search fields with one click. The Querybuilder allows the user to create and save individual Queries. These saved Queries are only available to the user who created them.

Example of a Query in the WebOffice core client

Search modes in the WebOffice core client

Start the Querybuilder in the WebOffice core client

Querybuilder in the WebOffice core client
The Table of Content displays all available map services, layer groups and layers in the Ribbon Menu of the WebOffice core Clients. In the following example, for example, there are 3 map services with their respective layer groups. In addition, a layer underneath it can also contain the topics of the individual layers. If available, a legend is also displayed in the Table of Content. If the map view is changed, this will result in a change of the Table of Content according to the services included in the map view.
Note: If no map view is declared by default, it is composed of the project settings configured under Table of Content.

Example of a Table of Content in the WebOffice core client
The user can control the visibility of individual map services, layer groups or layers by activating or deactivating the checkmark in the respective line.
Map Services
Dynamic map services can be activated or deactivated separately either via the map service, the layer group or the layer.
Cached map services can only be activated or deactivated via the map service, not via the layer group or layer.
If map services are not available, this is indicated by a corresponding message within the map area.
Warning messages in WebOffice core Client in the map area
Dynamic Mode
Non-visible scale related layers are displayed in gray in the Table of Content. These layers can be hidden from the Table of Content by changing to dynamic mode.![]()

Presentation of non visible layers due to scale restrictions
Thematic mapping
In the Table of Content, additional thematic mapping of individual layers can be used for visualization within the map. The symbology of a layer can be changed dynamically. The user can select the style of a layer via defined layer files and display it on the map.

dynamical change of the symbology in the WebOffice core client
context menu
You can also use the right mouse button to display additional options using a context menu for map service or layer groups and layers. The following table describes the various options available in the context menu.
symbol |
functional description |
|
Zooms to the extent of the respective layer |
|
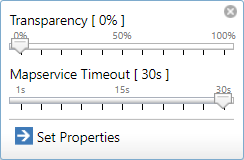
Opens the Service Properties (Transparency, Mapservice Timeouts) |
|
Settings to determine the level of transparency of the map service
Maximum waiting time to call up the map service |
functional description of the context menu of the Table of Content in the WebOffice core client
Dynamic legend
The Table of Content supports the display of dynamic and static legends in WebOffice core client. In addition, the defined legends can also be translated into other languages and visualized in the Table of Content.
Layer Filter
The Layer Filter in the Ribbon Menu allows you to exclude different objects from the map area. Predefined filter queries in the project are displayed in the Layer Filter View. Depending on the configuration, the corresponding filter parameters are displayed either expanded or collapsed at the start of the project. After activating the filter, only those objects that match the filter conditions are displayed. You can use corresponding filter categories for grouping the Layer Filters via the project settings. This results in a clear and better structuring of several filters for the user. The individual filter categories can be dynamically collapsed for clarity in WebOffice core Client.

Example for Layer Filters including grouped Layercategroies in the WebOffice core client
Routing
The Ribbon Routing in the Ribbon Menu allows you to calculate the fastest route between two points. The Routing is divided into the following points:
1.Entering the routing destinations for Routing
2.Result of the Routing in text form (route description)
3.Result of the Routing in the map
4.Result of the Routing as PDF
1. Entering the routing destinations for Routing
The routing destinations can be entered in several ways.
The following options can be used to enter routing destinations:
•Input via text field
•Input via context menu
The input via the text field is made directly via the Routing Ribbon in the Ribbon menu. By default, one input text box is available for creating a route destination (start destination). The user can enter the address in the text box, which is located on the map after confirmation (enter key or focus outside of the text field). Correctly found addresses are indicated by a green text field. If the entered address could not be located, the text field is displayed in red. By using the button Add Stop another text box will be created and a second address can be entered in the box.
After entering at least 2 positions correctly, a route can be calculated. Click on the Calculate Route button to calculate the set route.

Eingabe der Routing Stops per Textfeld
Additional options for the Route Calculation tool are shown in the table below.
symbol |
functional description |
|
Add any numbers of stops |
|
Calculation of the respectively configured route |
|
Deleting the route in the map area |
|
Zoom to the calculated route |
Route calculation functions
Furthermore, the WebOffice core client also offers the possibility to set routing stops directly in the map area of the application. To do this, the context menu within the map can be opened by right-clicking. With the Set Routing Stop function, this position can be added and appears as the localized routing stop within the map.
 in the map area")
Setting a routing stop via context menu (right mouse button) in the map area
Within the map, localized routing stops are then assigned as points with the corresponding sequence numbering. So, the user can easily recognize where the requested addresses are located and in which order the routing stops are processed.

Anzeige der Routingstops in der WebOffice 10.6 Core Client Applikation
2. Result of the Routing in text form (route description)
After calculating the route, an additional tab for the route description appears in the Ribbon Menu. The Route Description ribbon displays the most important data and route descriptions. The distance of the calculated route, the journey time for the specified means of transport and the description of the route can be read off. The route description is an interactive route description which acts with the map area of the WebOffice core client. You will find more detailed information in the following section "Result of the Routing in the map".

Registerkarte Routenbeschreibung im linken Menü
5. Result of the Routing in the map
The result of the Rounting is displayed by a red line between the Routing stops in the map area.

Display of the calculated route in the WebOffice core client
The route description of <%CORE% client can also be made visible on the map. By traversing a description in the Ribbon Menu a segment of the route can be highlighted in the map area. In addition, the description of the section is shown in the map area. The WebOffice core client provides a link between the route descriptions and the displayed route in the map and thus enables a clear representation of parts of a route.

Selection of the individual route segments including description in the map area
4. Result of the Routing as PDF
The WebOffice core client also allows you to print the route description in PDF format. By clicking on the PDF or Print button, the route descriptions and the selected routing destinations are displayed formatted accordingly. The preview of the PDF can be printed or saved in PDF format.

Option to show route description in PDF format

Preview of the route description in PDF format
MapViewSlider
The MapViewSlider is available in the Ribbon Menu when the External GUI module is configured and a docked window type is selected. It offers an alternative switching option for map views using the slider. The name of this application and thus also the display name in the Ribbon Menu can be freely choosen in the configuration.
Note: More information on configuring the MapVIewSlider can be found in the chapter Configure MapViewSlider as External GUI Module.
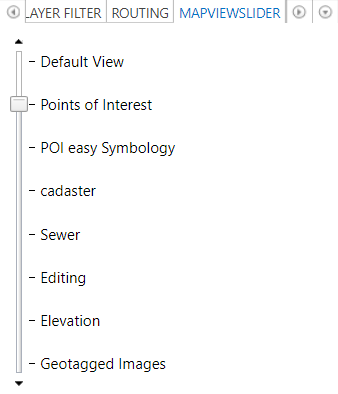
MapViewSlider in the WebOffice core client