Configure PAGX Print Template for Export of Static Tables

The data source of the attribute table is statically configured in the VertiGIS Printing print template (PAGX print template), i.e. it is not controlled by WebOffice. The configuration of the print template must be carried out manually by an administrator/creator in ArcGIS Pro. A separate print template can be created for each desired table, but several tables can also be arranged on one print template.
The display (i.e. the size of the display area) of a table can be defined so that, for example, only the first listed entries are visible in the printout. When configuring a table on the printing template, you can specify how many and which fields are to be displayed on the printout.
An attribute table can be configured in one of the following three operating modes:
•(A) All objects of the data source are listed.
•(B) Only those objects of the data source which are located in the current WebOffice map section (print area) are listed.
•(C) Only those objects of the data source that are currently selected in WebOffice with a selection tool are listed.
Below you will find instructions on how to configure an attribute table.
Basic settings in ArcGIS Pro
1.In ArcGIS Pro, you must first create a map with one or more layers whose features are to be displayed in an attribute table.
|
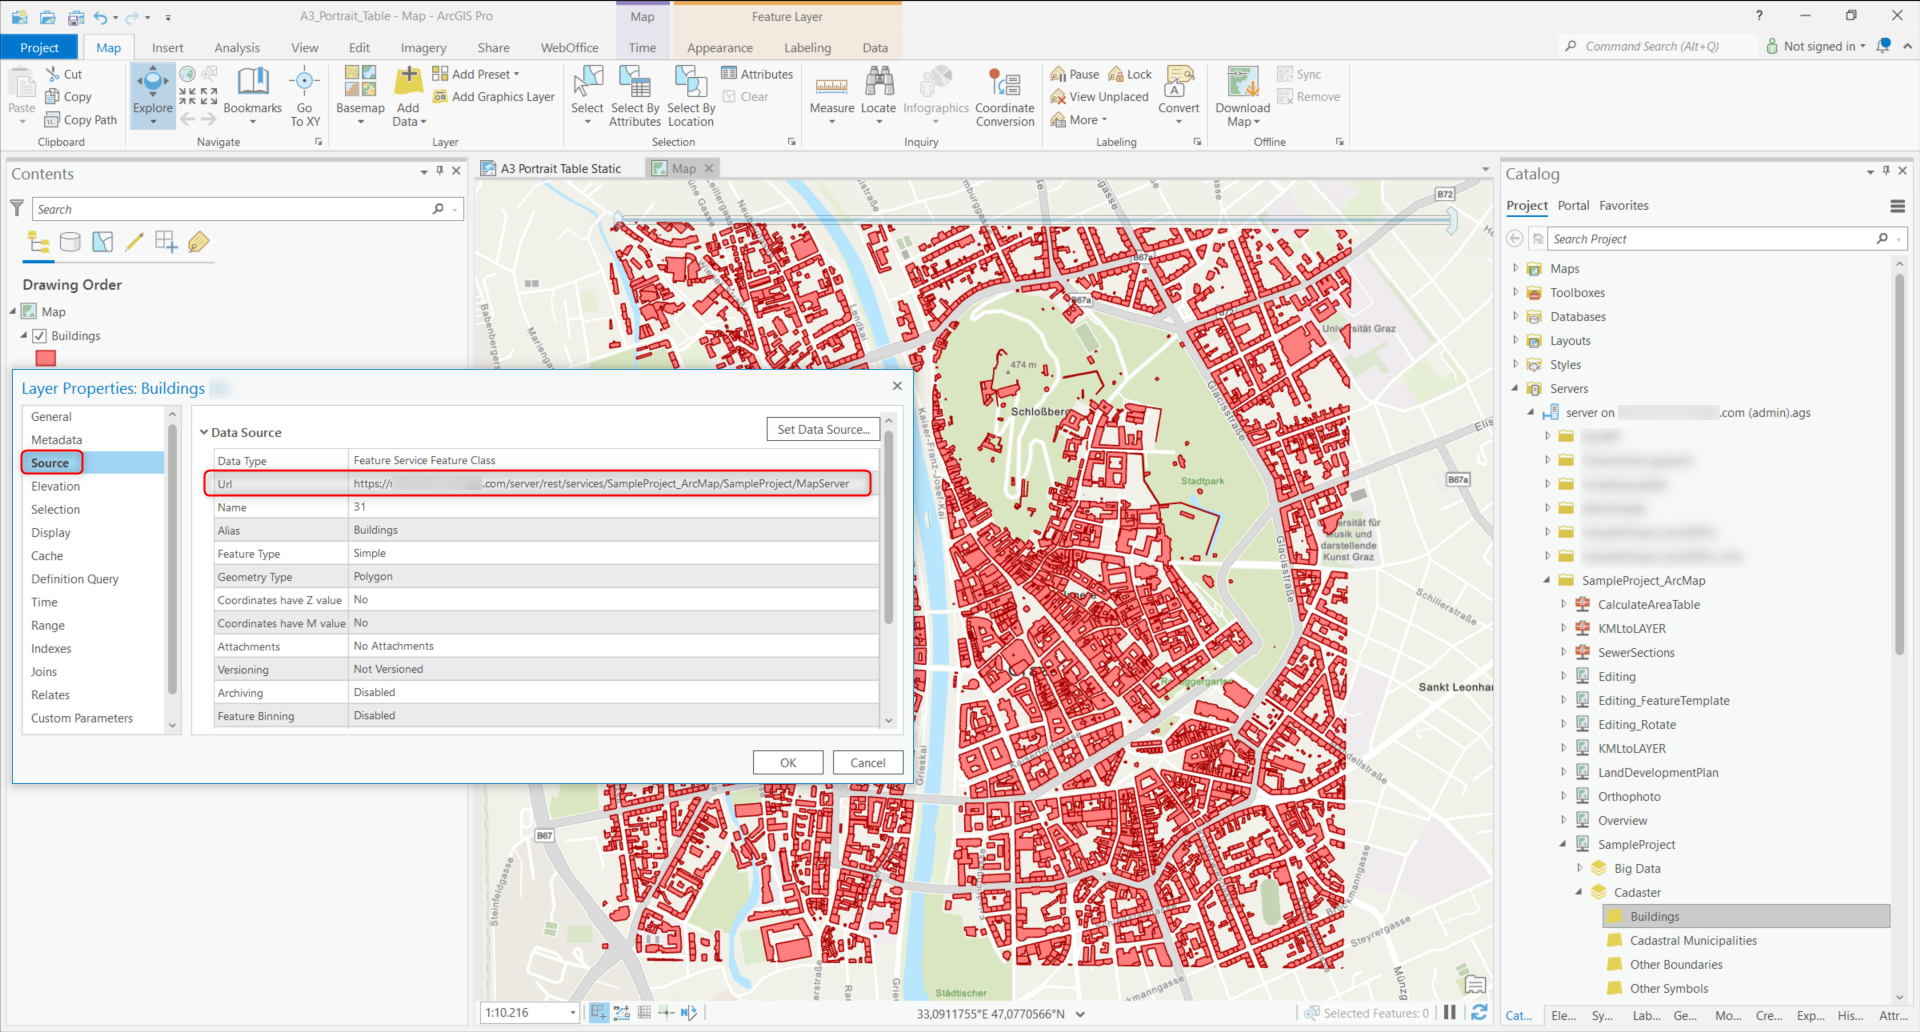
•If MapServices are used and the attribute table is to be displayed on a MapService basis, the following must be noted: A connection to the ArcGIS Server must be established in ArcGIS Pro (see image below, right-hand side in the Catalog). Please note that the layer must be added to the map without the group layer!
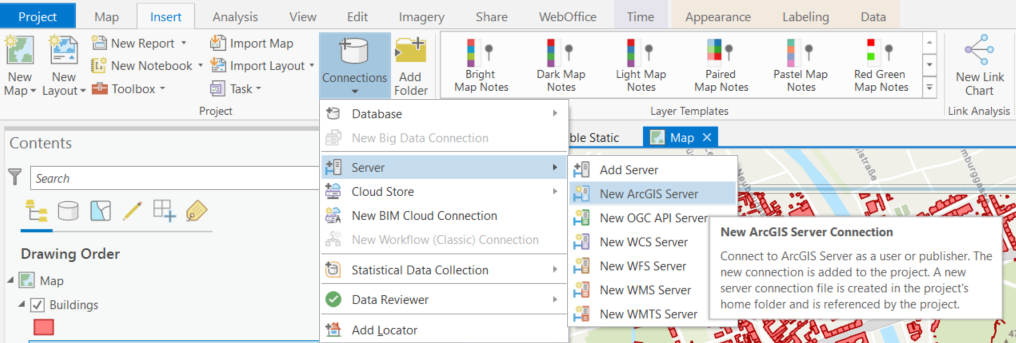
•If the ArcGIS Server connection is missing, this can be done via "Insert > Connections > Server > New ArcGIS Server".
•WebOffice needs the corresponding FeatureService in the background to retrieve the data for the table. The data source can be checked for the inserted layer under "Layer Properties > Source".
|

2.You must then switch to layout mode, select a layout template and integrate the Map Frame into the template.
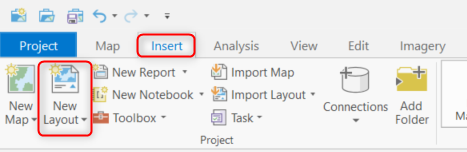 |
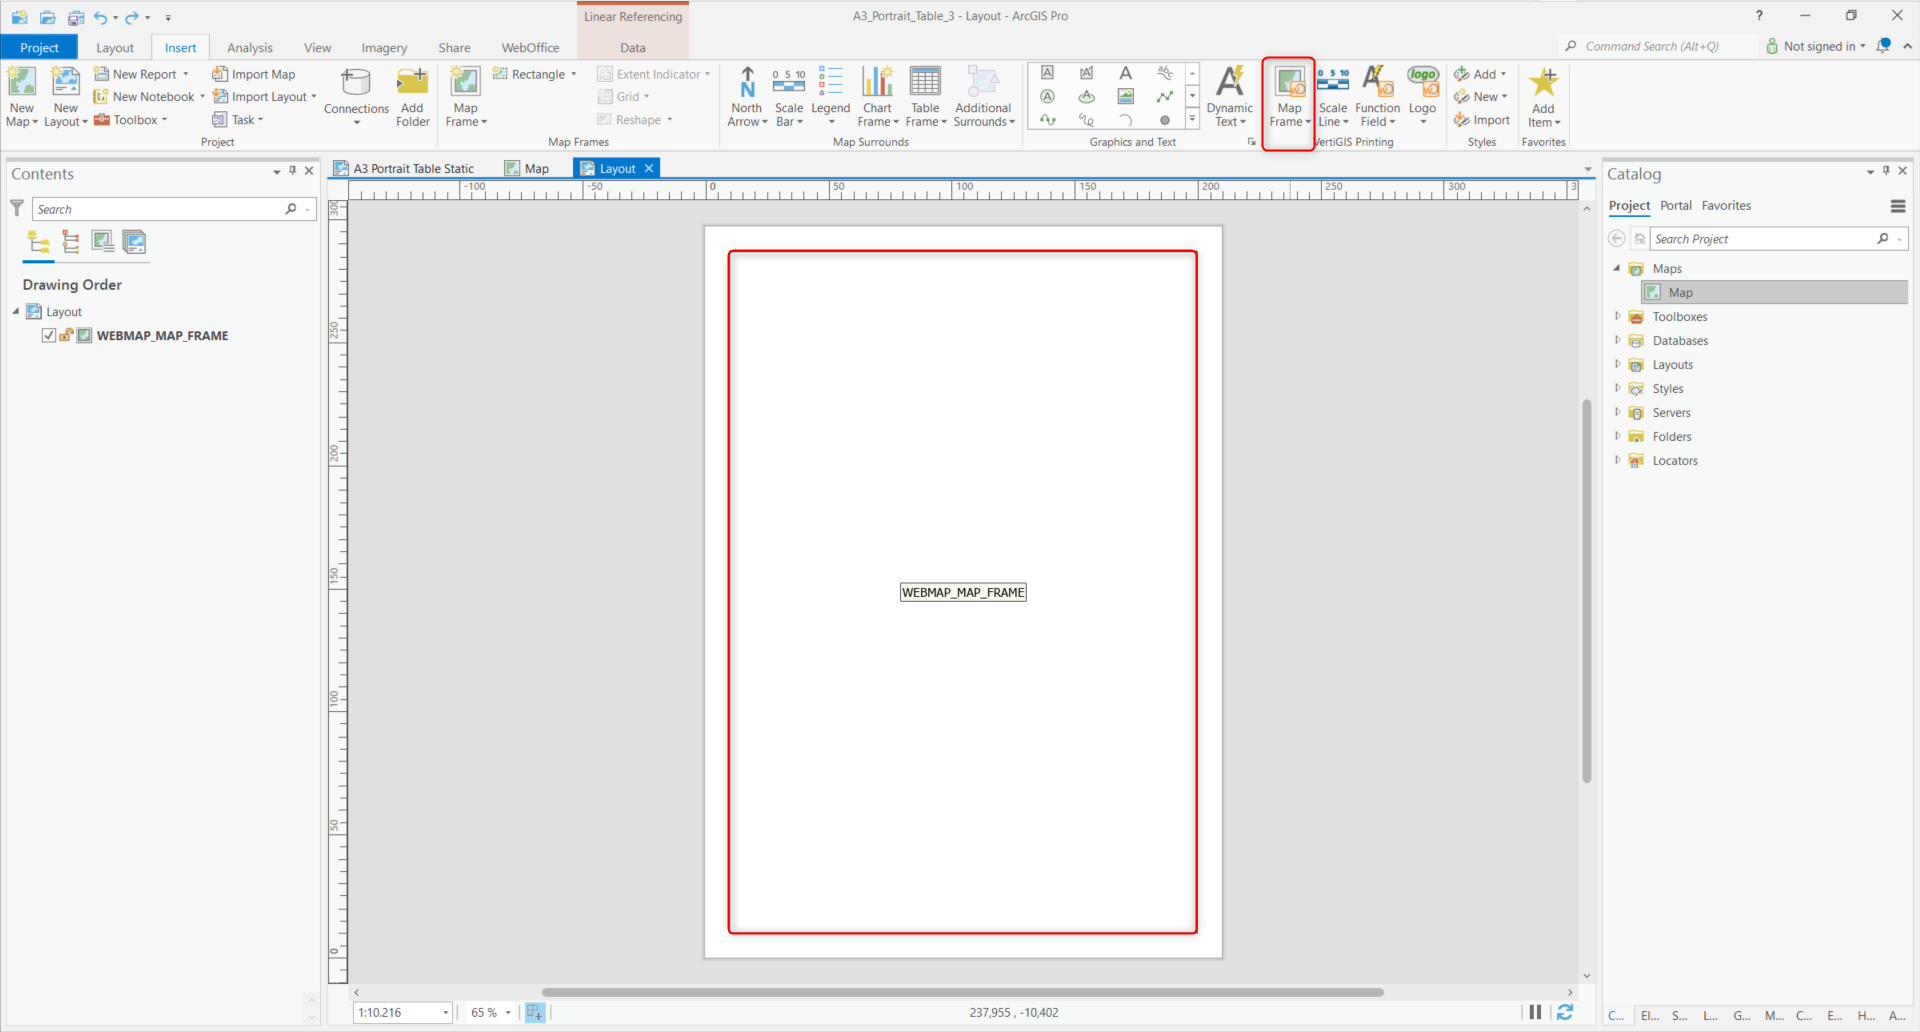
3.The Map Frame insertion option is available twice: The standard one from ArcGIS Pro (on the left) and the Map Frame (framed in red in the image below), which is included in the VertiGIS Printing toolbar (Layout Designer). This is supplied as an add-in with the installation of WebOffice Author Standalone. If the Layout Designer is missing, it is highly likely that the add-in was not activated during installation.
|
You can find information about this topic in chapter WebOffice author standalone setup in the main documentation of WebOffice. |
The WEBMAP_MAP_FRAME is the Map Frame and it should contain the map that will be displayed in WebOffice and shown in the printout. It is the basic framework.
4.Next, the map must be referenced in the WEBMAP_MAP_FRAME. The map must first be added using the standard Map Frame option. You can decide how much space the map should take up in the Map Frame. In the example below, the map covers the entire map frame.
 |
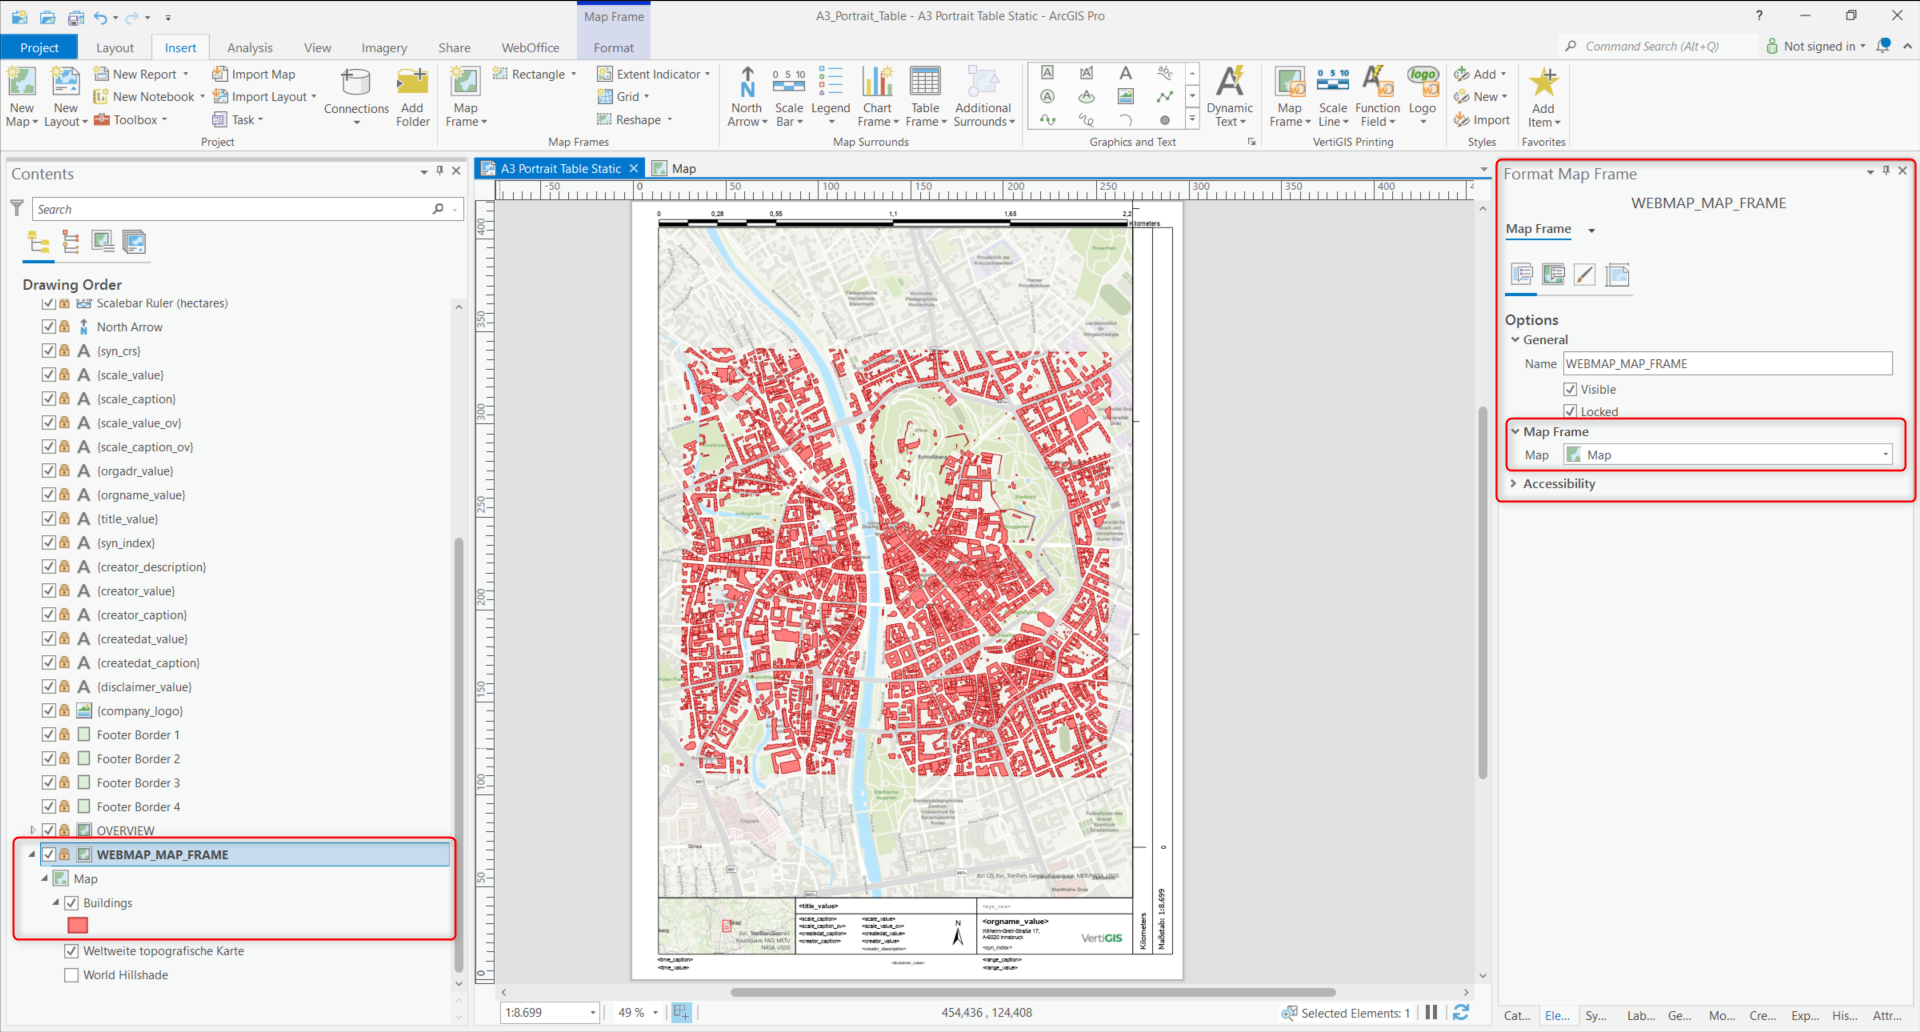
| For referencing, the settings (Format Map Frame) of the Map Frame on the left-hand side can be opened either via Table of Contents by double-clicking on the content WEBMAP_MAP_FRAME, or via the context menu by right-clicking on WEBMAP_MAP_FRAME > Properties. |
5.Under Map Frame (framed in red in the image below), the previously integrated map must be selected. In the example below, the map is called "Map".
 |
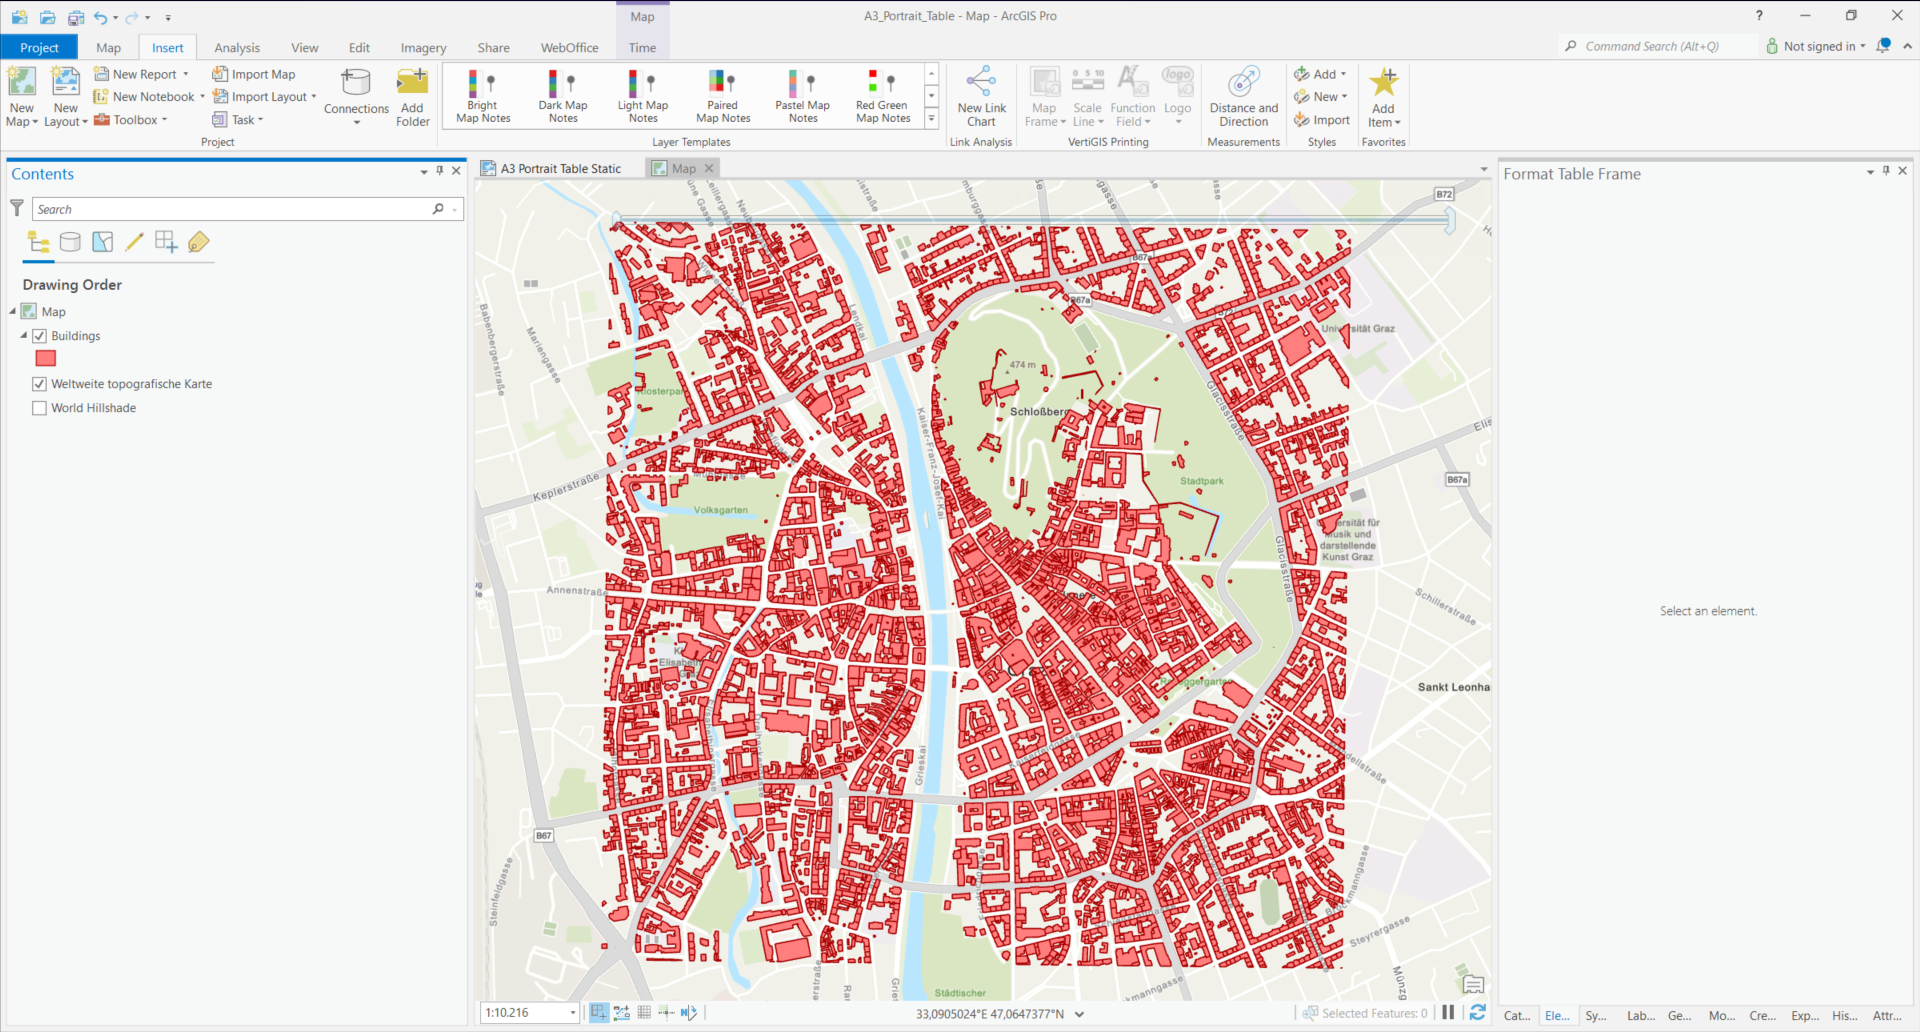
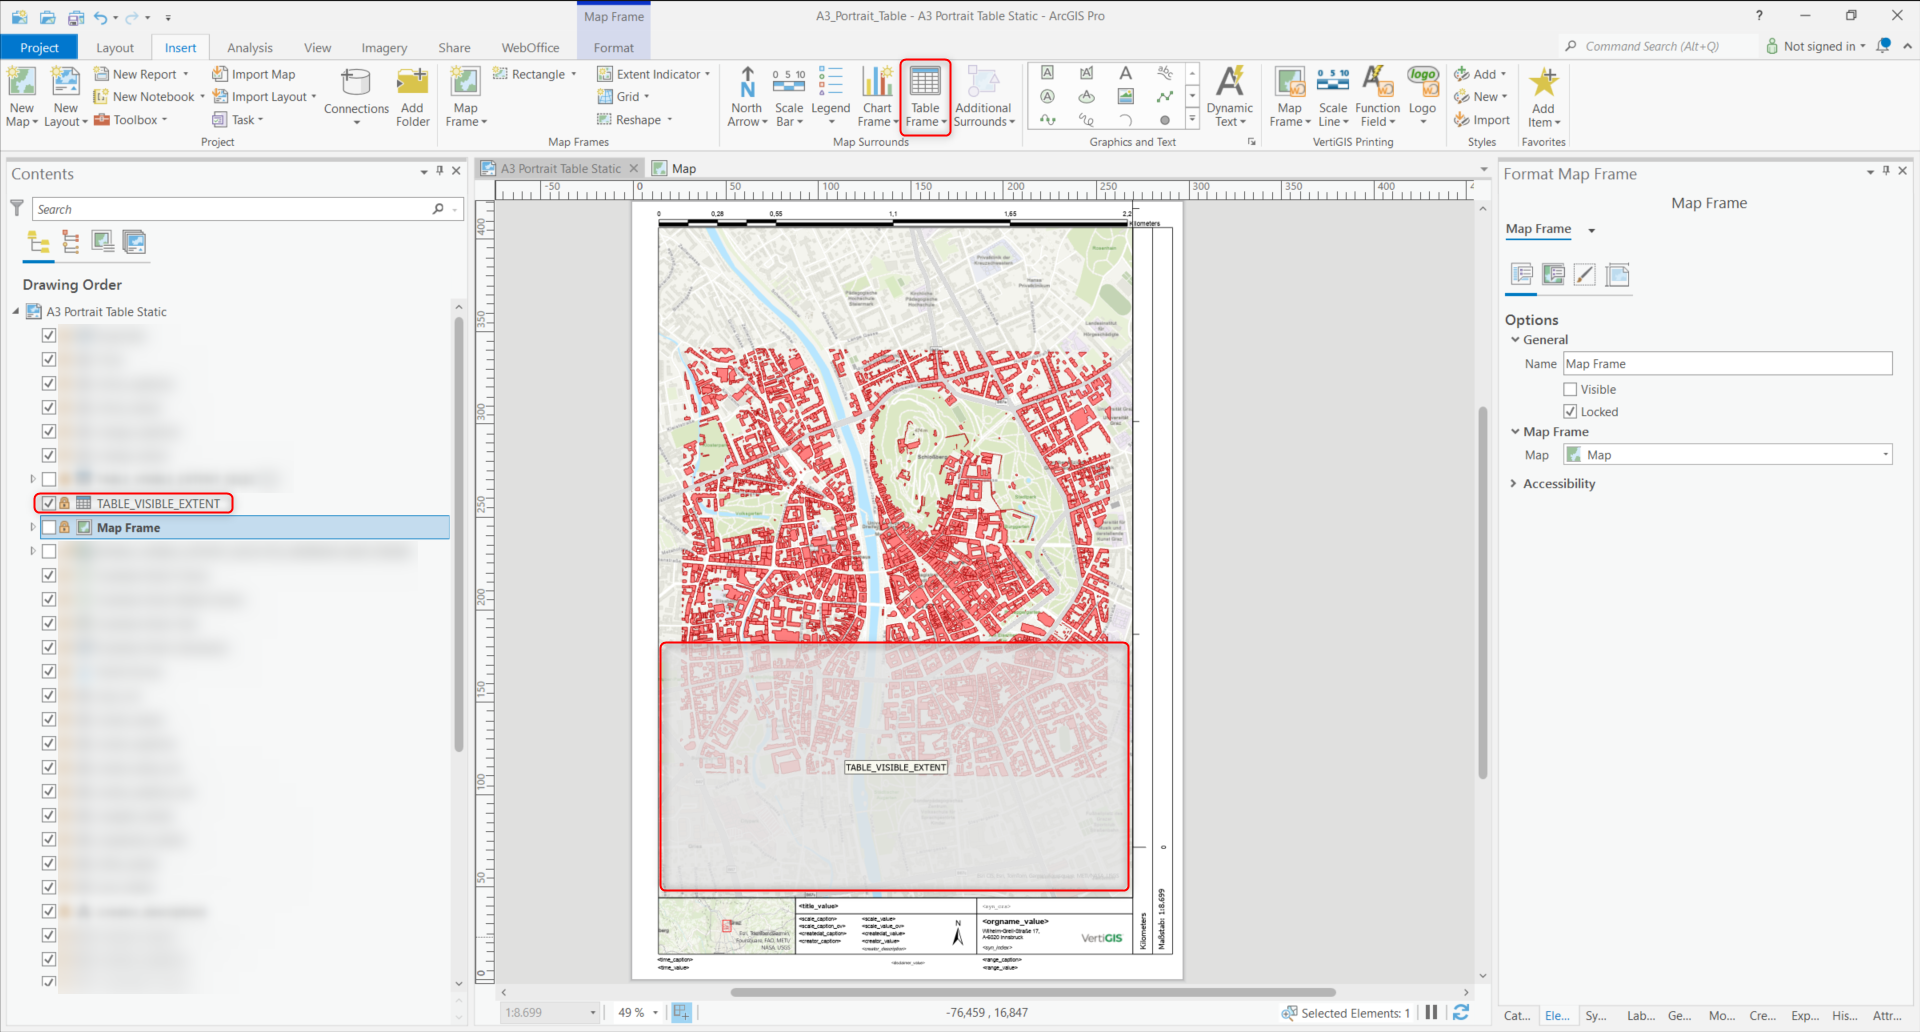
6.The next step is to add the Table Frame that is referenced with the table (see image below).
 |
Operating modes of the attribute table
You can choose between the following three operating modes:
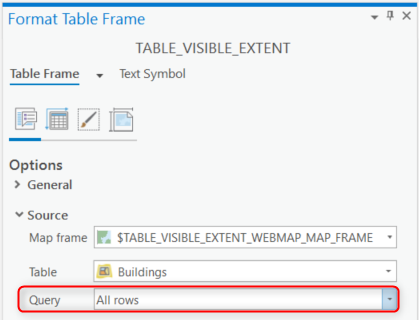
•(A) All objects in the data source are listed.
o The value "All rows" must be set in the Query field.
•(B) Only those objects of the data source that are located in the current WebOffice map section are listed.
o The value "Visible rows" must be set in the Query field.
•(C) Only those objects of the data source that are currently selected in WebOffice are listed.
o The value "Visible rows" must be set in the Query field.
o The name of the table must contain the postfix "_SELECTED". A valid name would therefore be "TABLE_VISIBLE_EXTENT_SELECTED", for example.
Example: Operating modes (A) and (B)
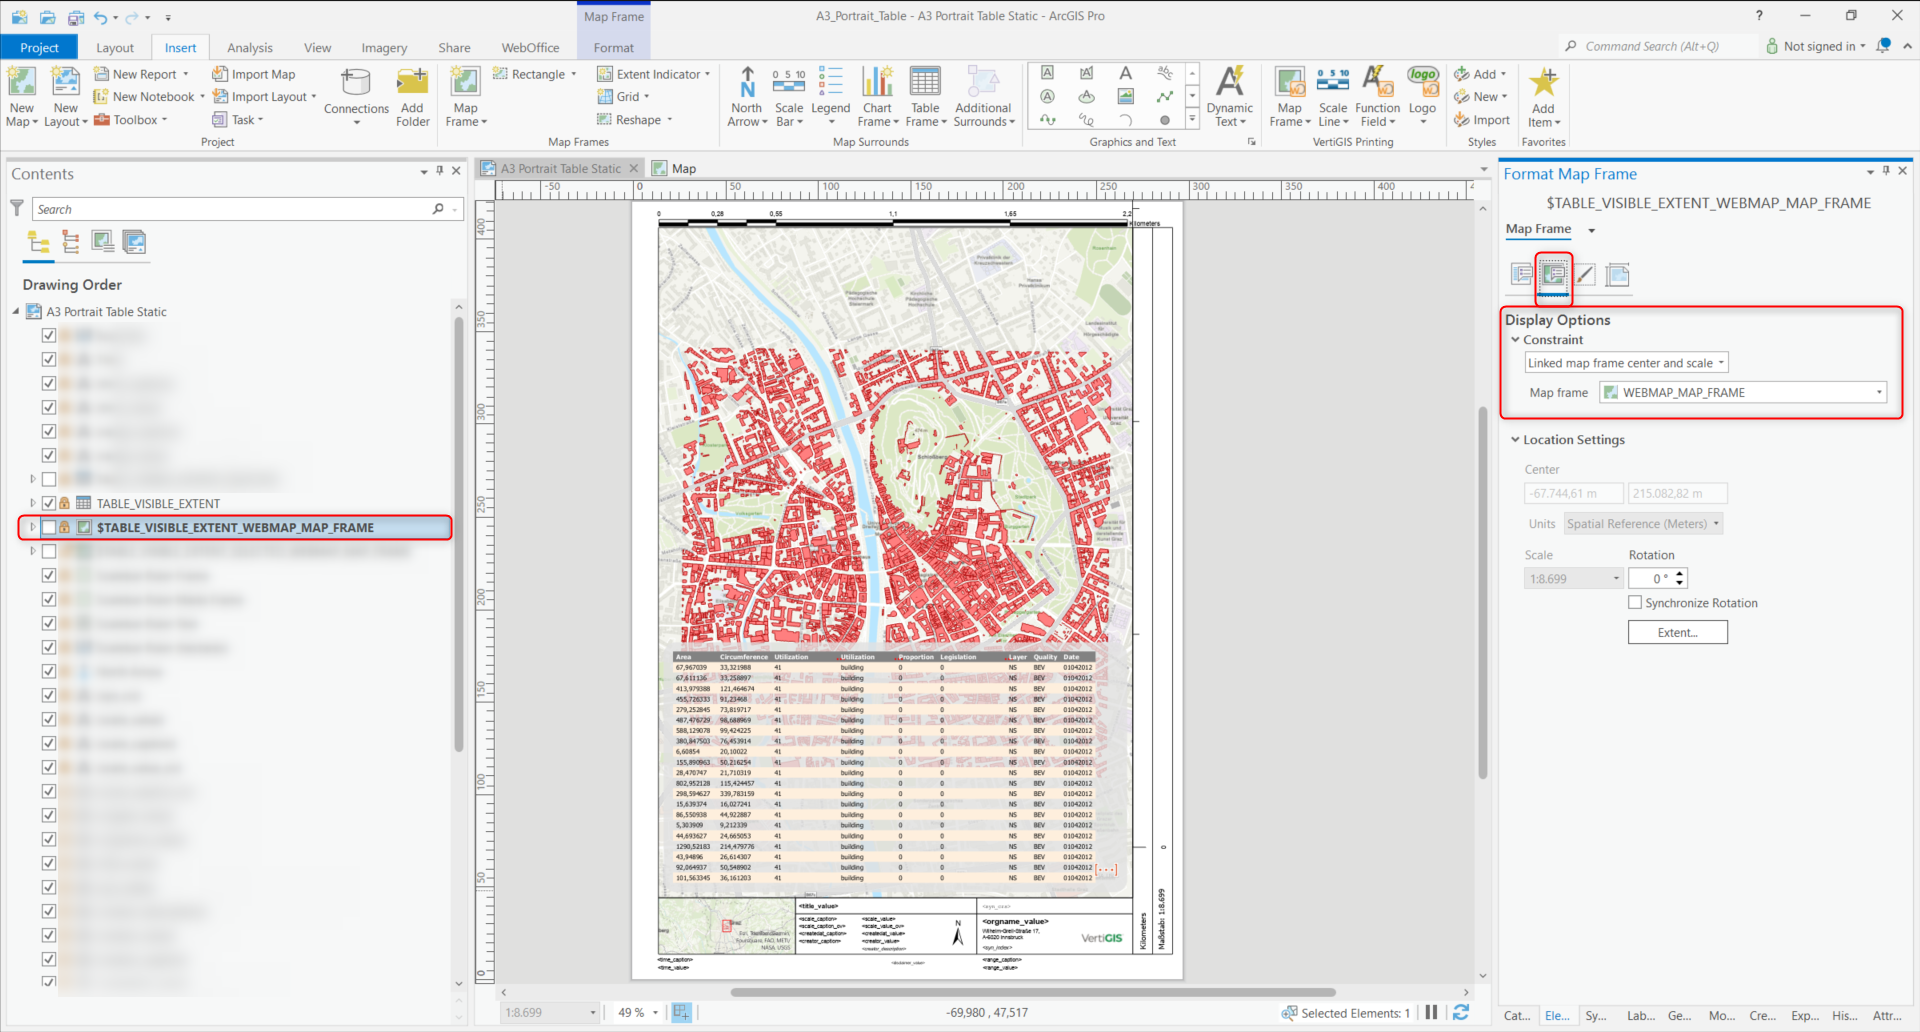
7.In the example, the Map Frame is renamed to "$TABLE_VISIBLE_EXTENT_WEBMAP_MAP_FRAME" to match "TABLE_VISIBLE_EXTENT".
| The map frame should be made invisible as it is only required for filling the attribute table and is irrelevant for WebOffice. |
 |
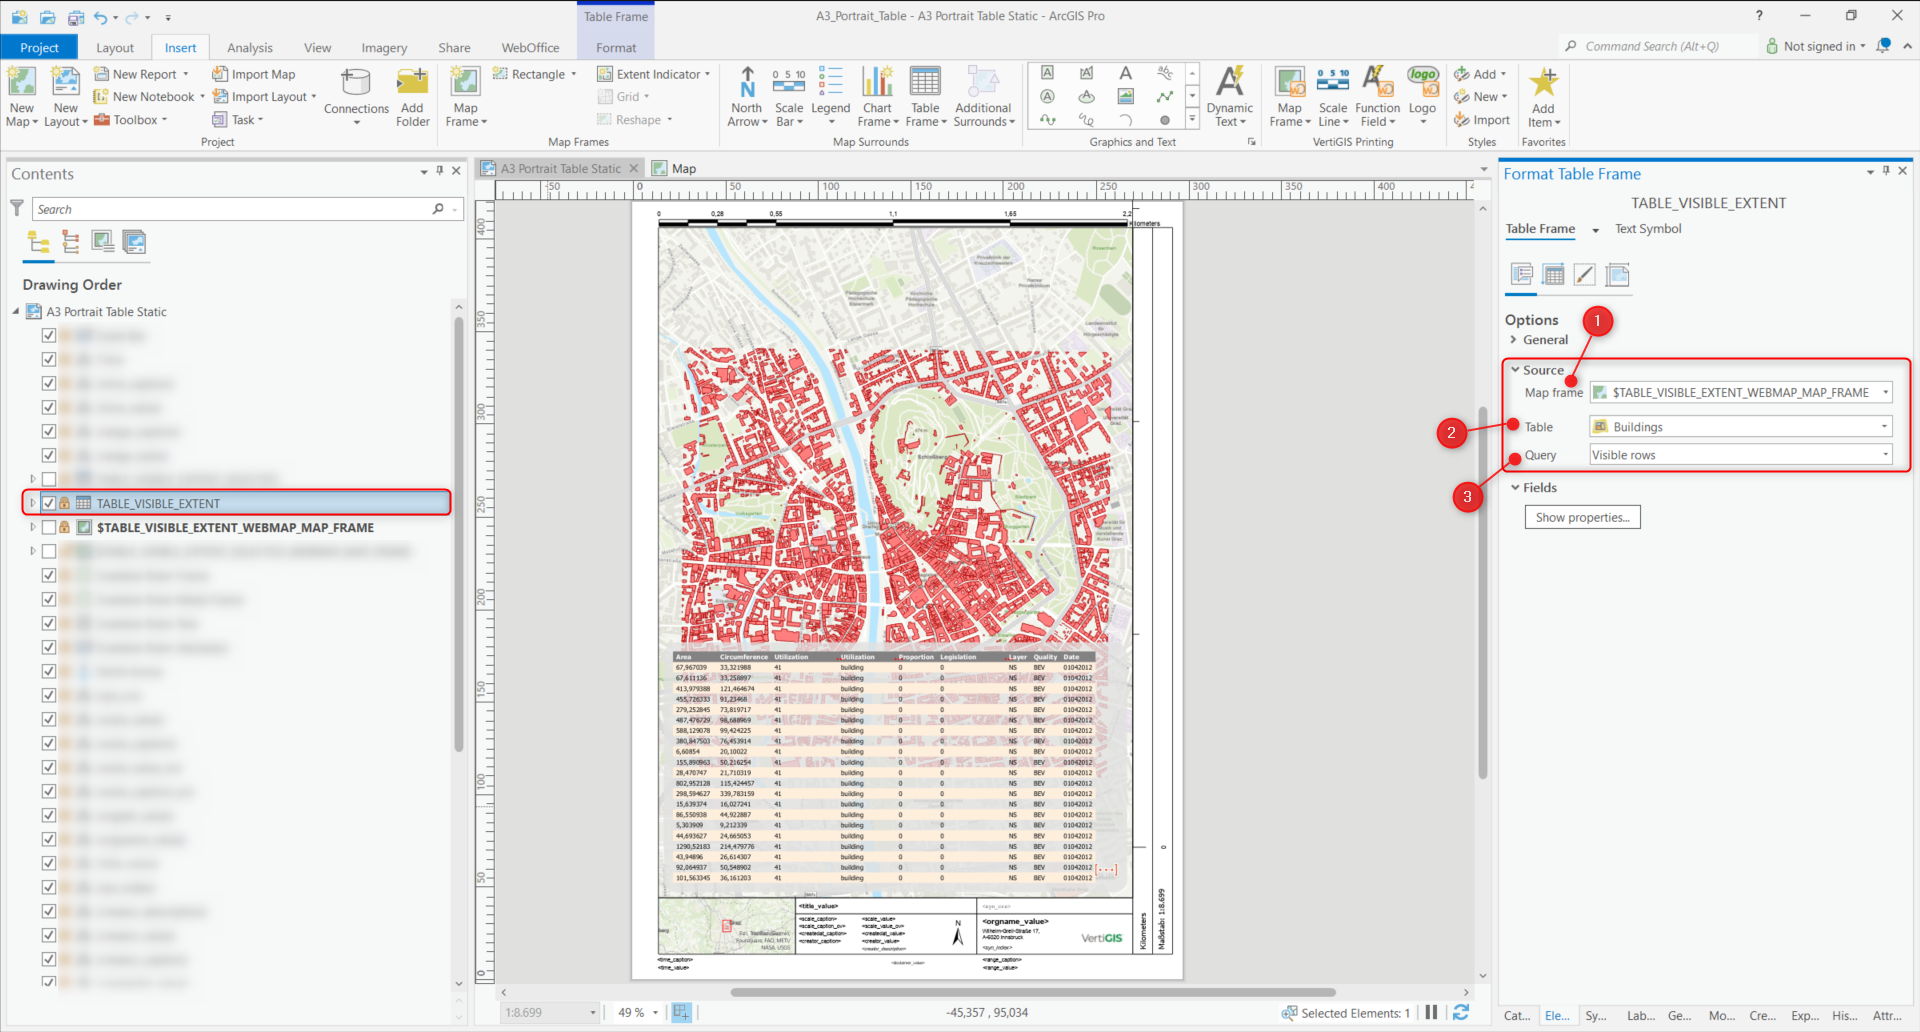
8.In the settings of the Table Frame (Format Table Frame), three parameters must be observed for the node Source:
| Under Map Frame, the correct map frame must be selected, the one that was named after the table name in step 6. The layer whose features are to be displayed in the attribute table must also be selected under Table. Finally, the "Visible rows" option under Query is used to configure whether the attribute table should only be displayed for those features visible in the map area or whether the attribute values for all features of the layer should be displayed with "All rows". |
 |
| In comparison to the image above, "All rows" is set here under Query. This configuration would cause all features to be displayed in the attribute table in the printout, even if they are not visible on the map section/in the print area. However, with a large number of features, this configuration choice will hardly provide a good overview. |
 |
9.Now return to the Map Frame that was previously renamed. The Display Options must be called up in the settings (Format Map Frame) (see image below). Under Constraint, "Linked map frame center and scale" must be selected and the Map Frame must be linked to WEBMAP_MAP_FRAME, as WEBMAP_MAP_FRAME is ultimately used for the display in WebOffice.
 |
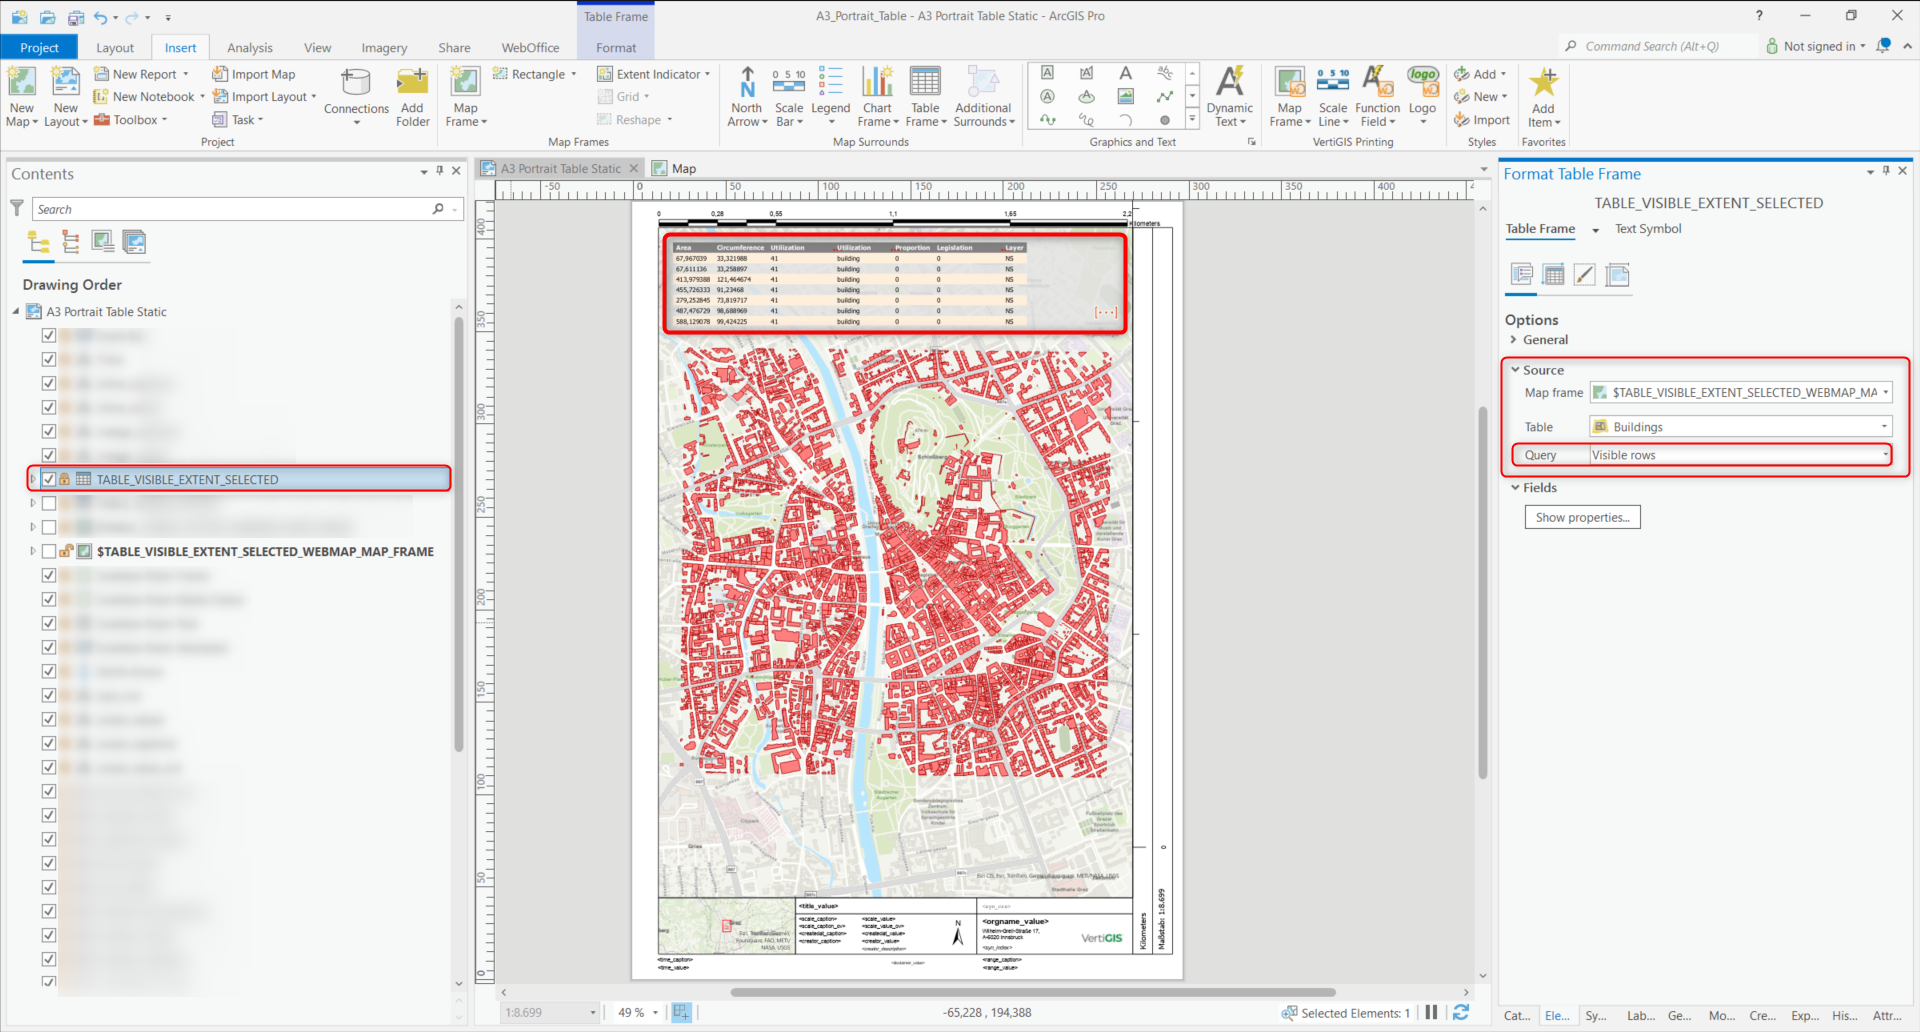
Example: Operating mode (C)
10.The attribute table by operating mode (C) works according to the same principle. However, it must be noted that "Visible rows" must be selected in the settings (Format Table Frame/Options) for the table frame "TABLE_VISIBLE_EXTENT_SELECTED" under Query (see image below).
 |
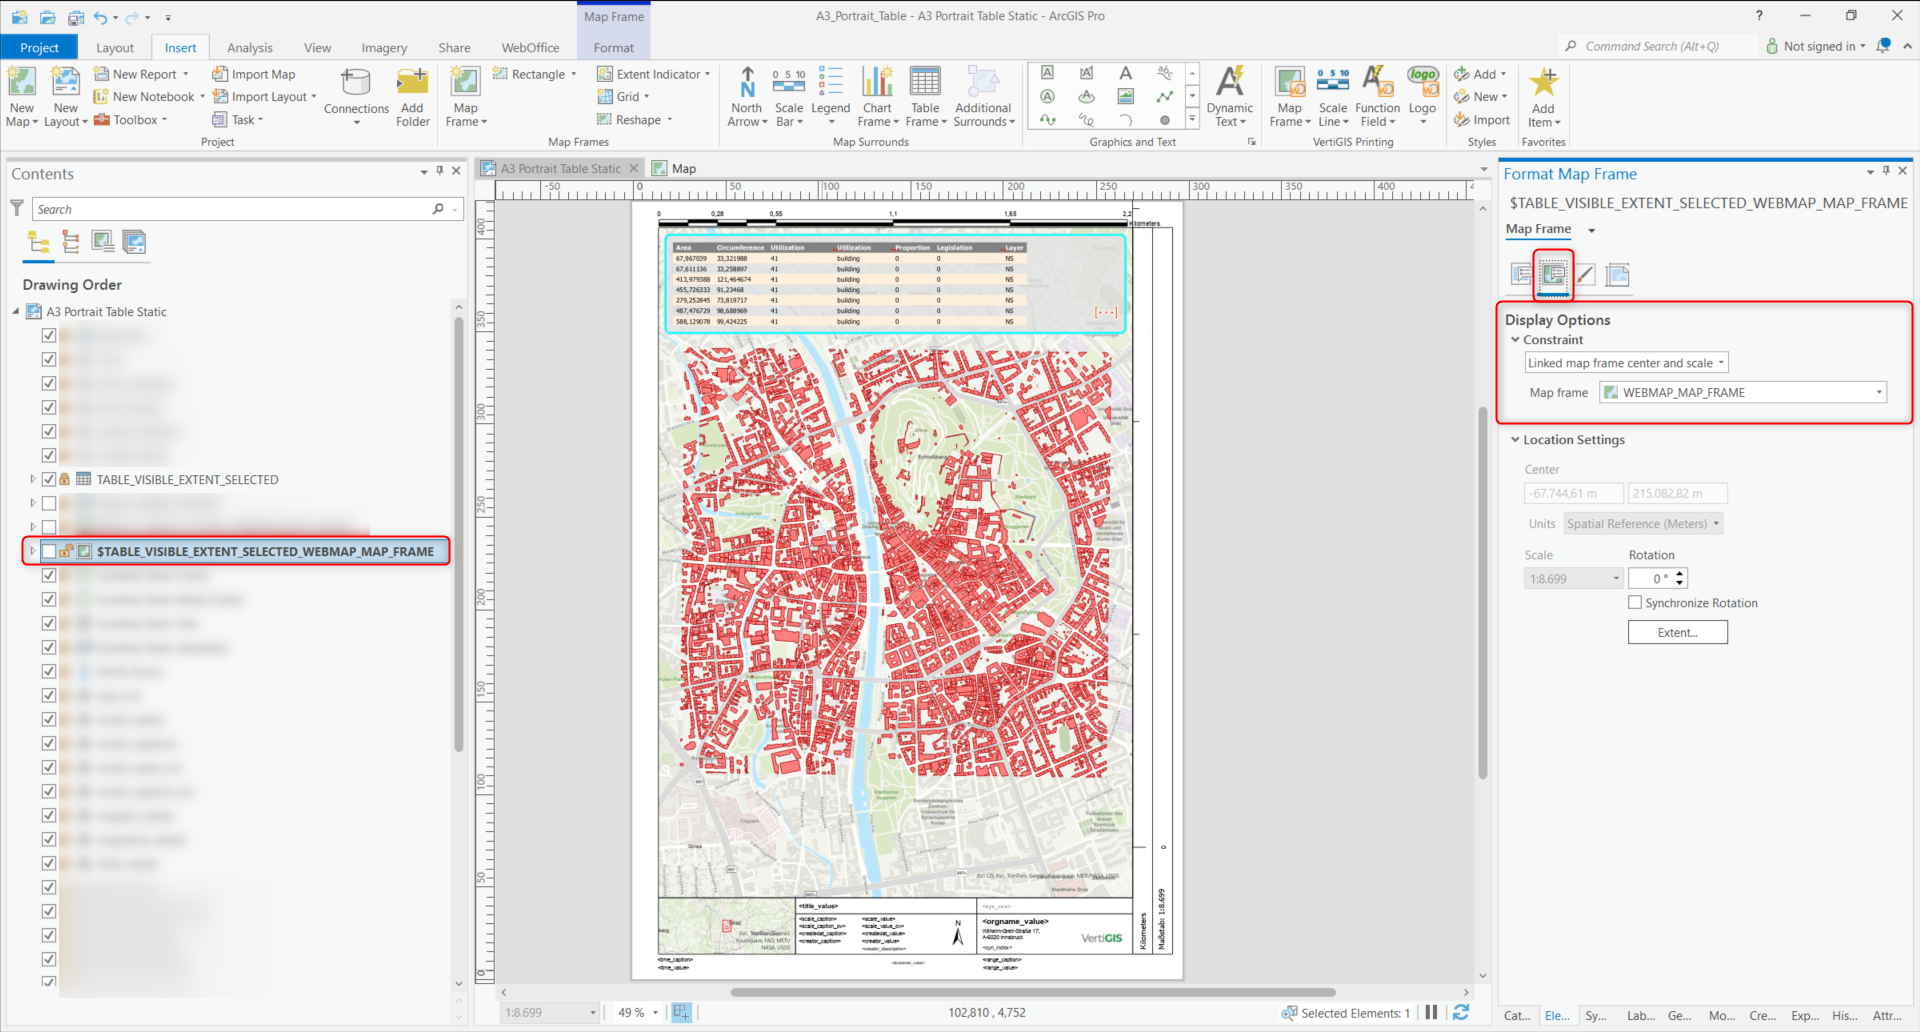
| The remaining settings remain the same or are identical to those of operating modes (A) and (B). |
| Among other things, the configuration of Constraint with "Linked map frame center and scale" remains the same in the settings (Format Map Frame) in the Display Options (see image below). |
 |
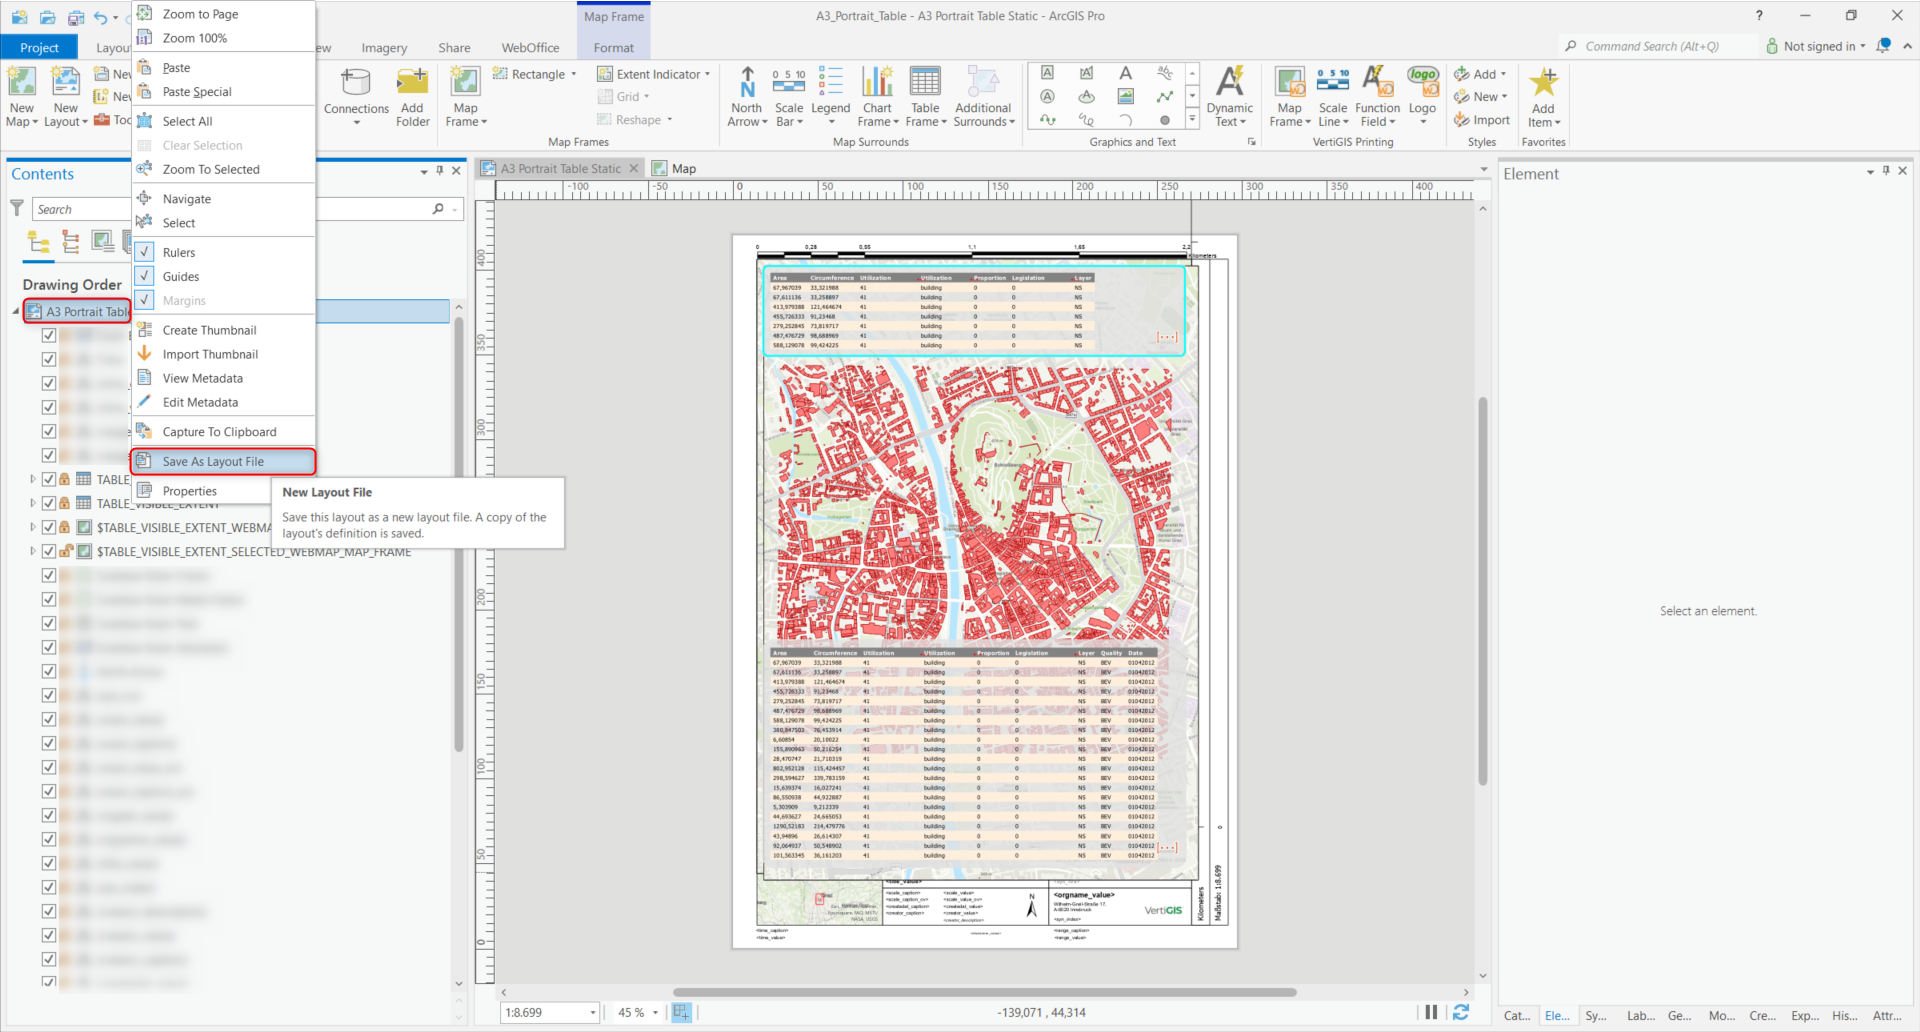
Feature Access and results in WebOffice
11.First, the template (as a PAGX file) must be saved under "..\arcgisserver\directories\VertiGIS_PrintLayouts". In order for changes made to print templates in ArcGIS Pro to take effect in WebOffice, the application must be reloaded (in SynAdmin).
 |
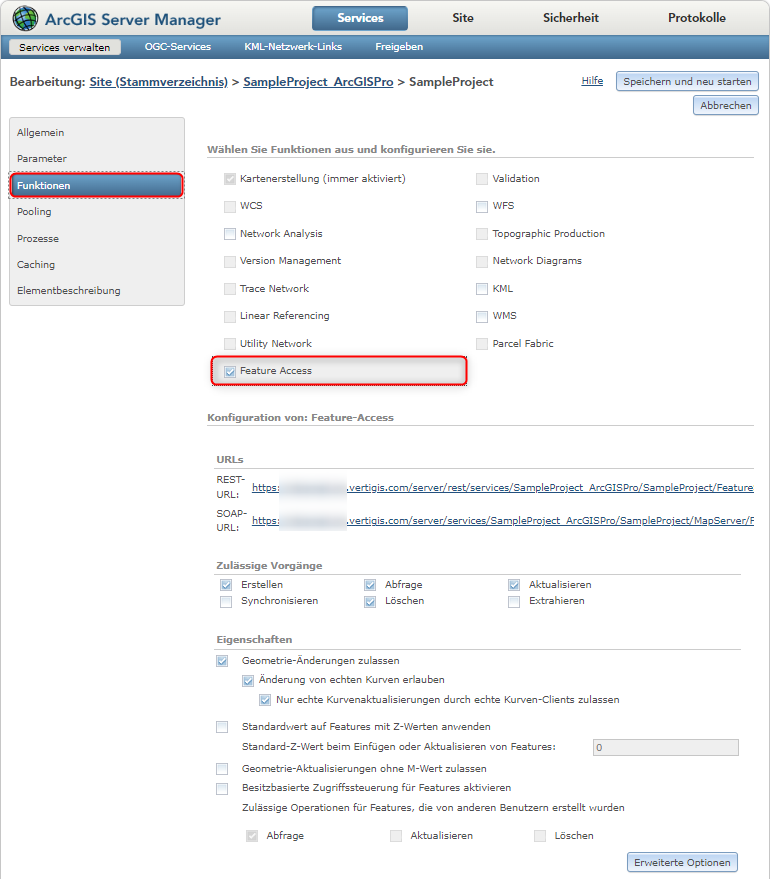
12.If Feature Access has not already been activated when publishing the map service, this step must be carried out in ArcGIS Server Manager. To do this, the map service must be selected under Site > Functions > Feature Access. When the change has been made on the ArcGIS Server, do not forget to click on the "Save and restart" button.
 |
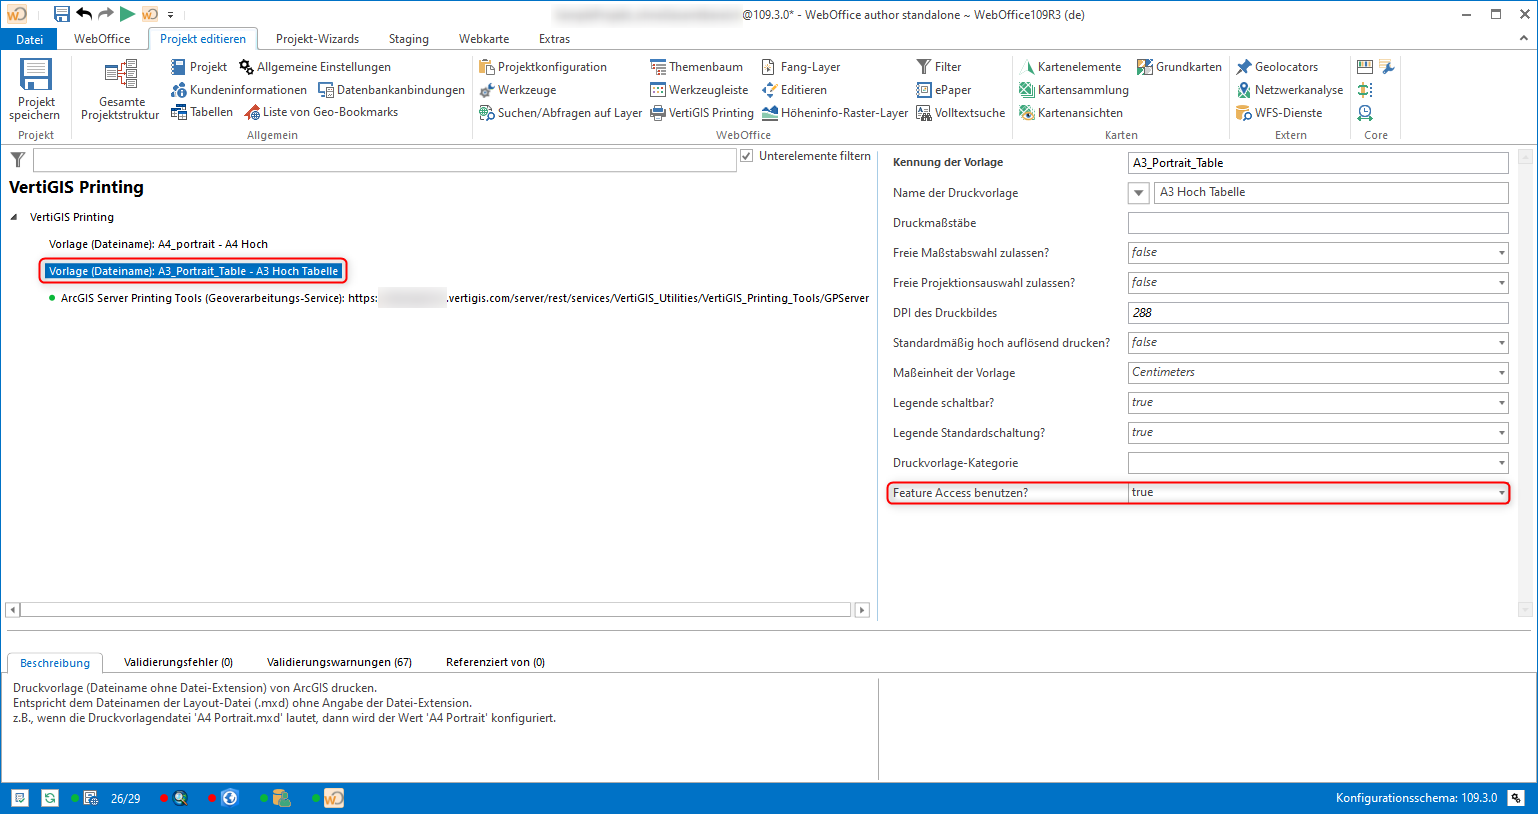
13.It is also necessary to activate Feature Access in the project configuration in WebOffice Author Standalone. To do this, the parameter "Use Feature Access?" must be set to true under VertiGIS Printing in the corresponding "Template (file name)".
 |
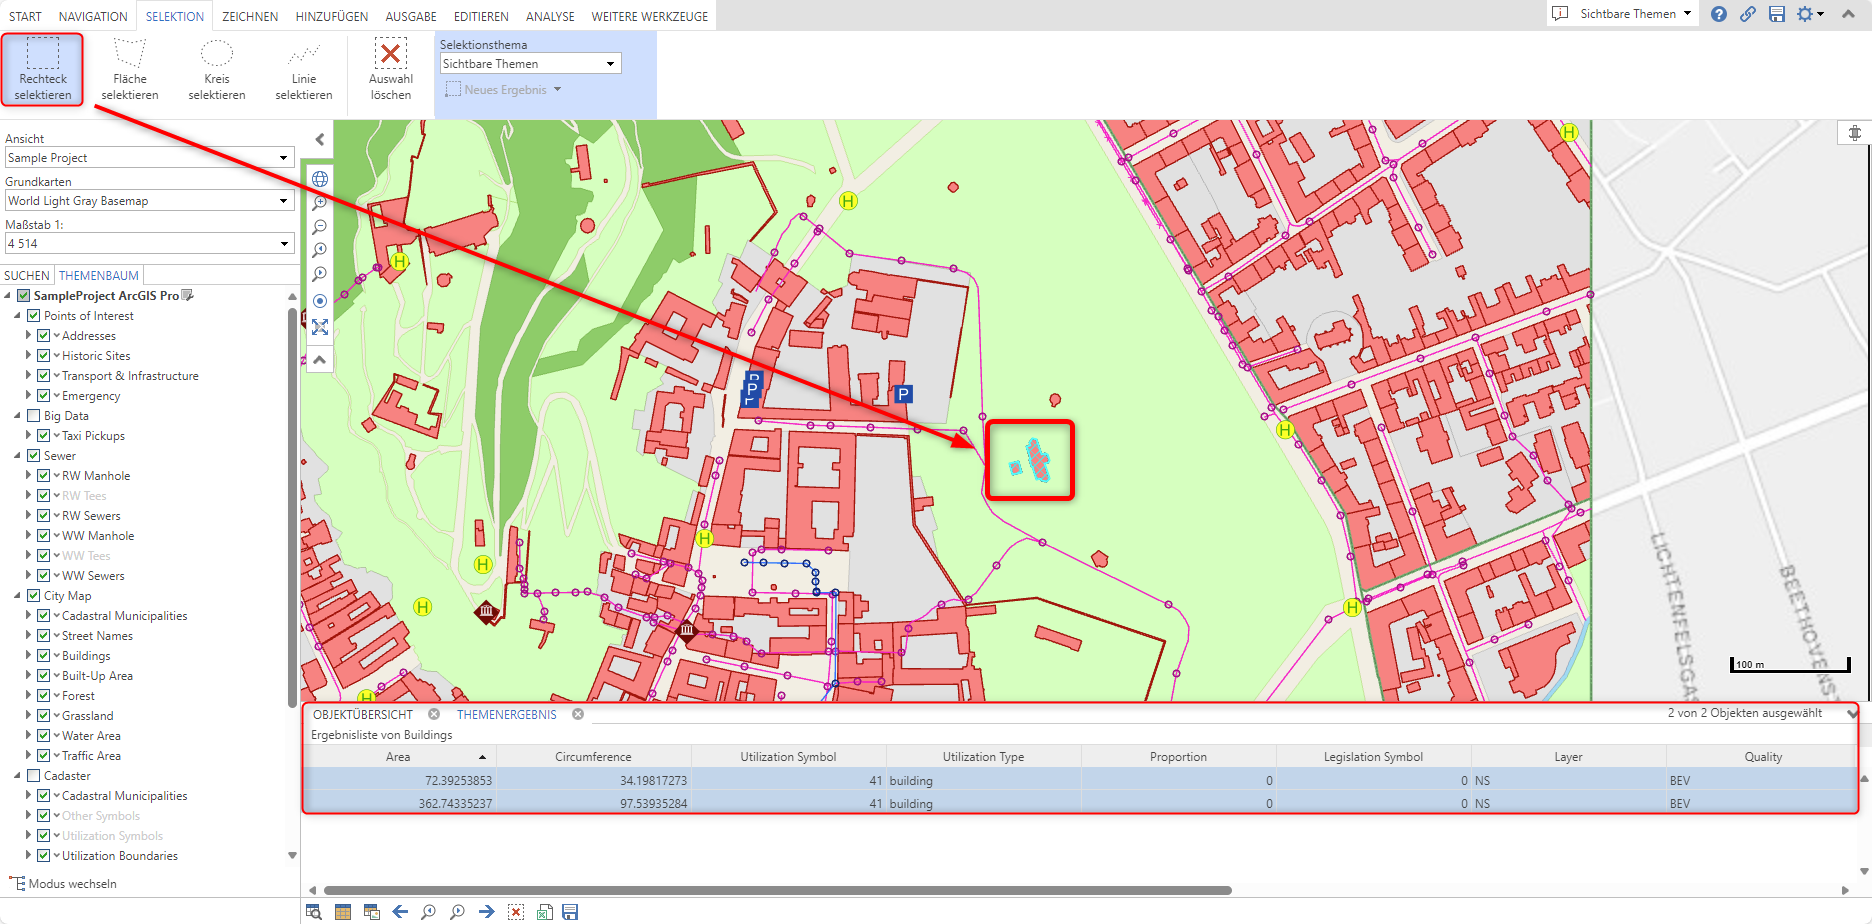
14.Publishing the WebOffice project:
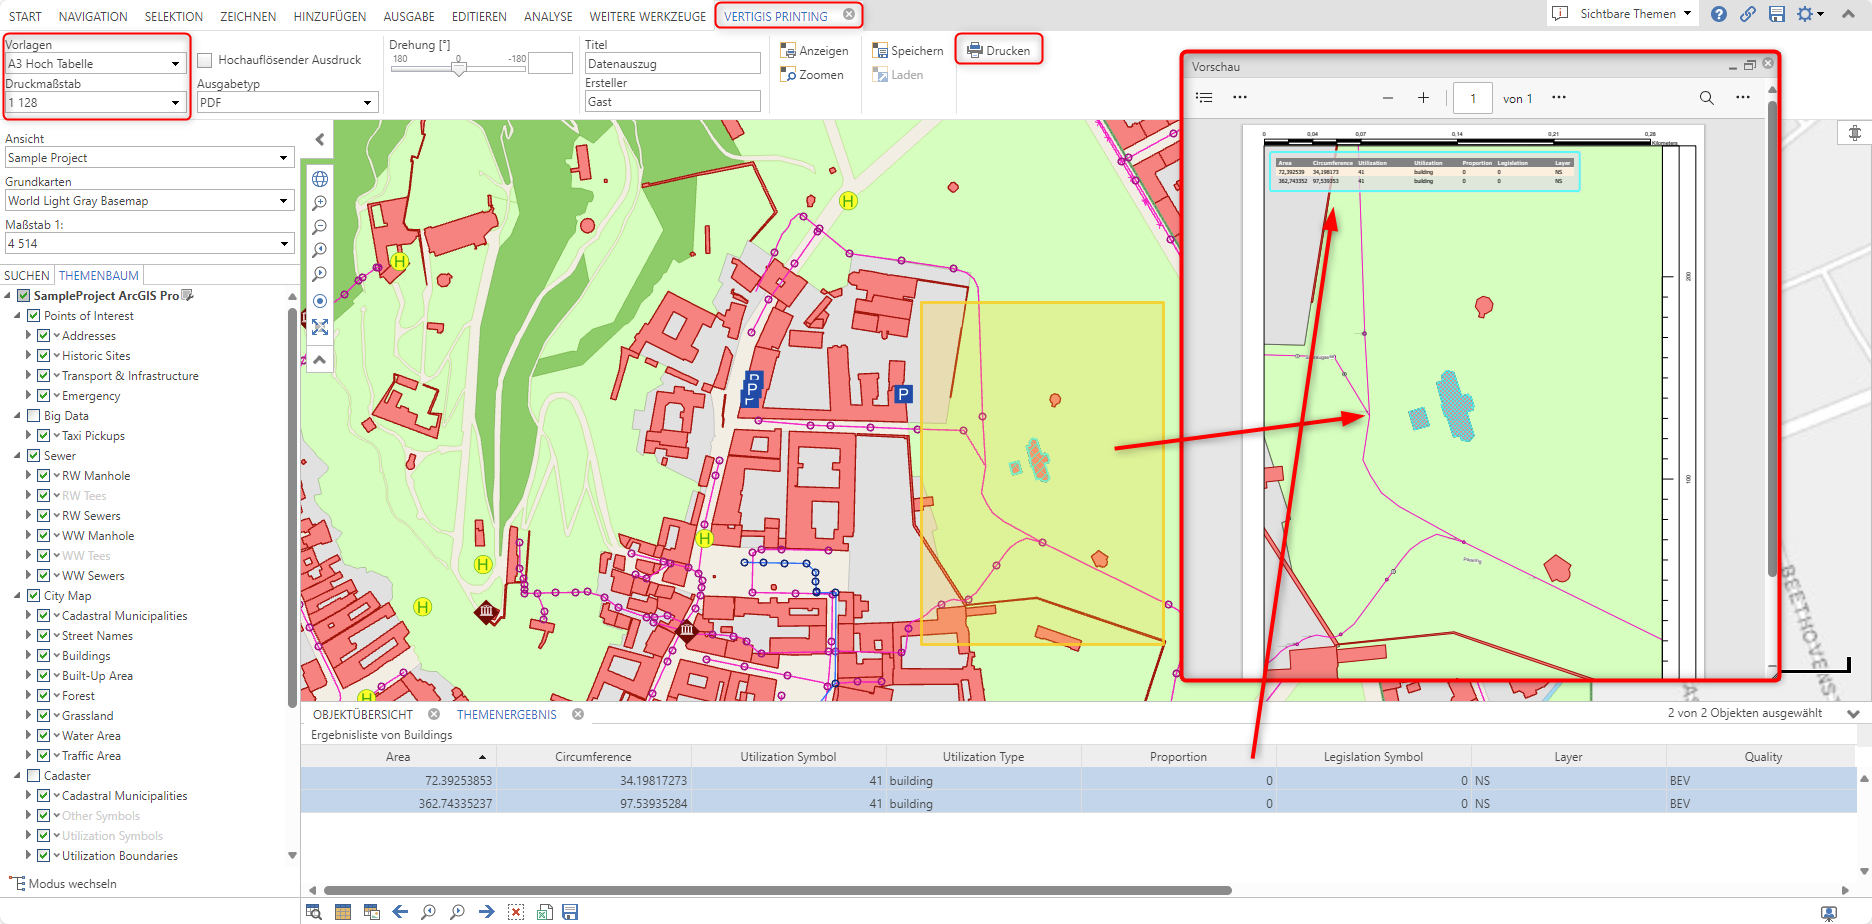
| If the operating mode (C) "Only those objects of the data source which are currently selected in WebOffice are listed." has been configured, features must of course be selected before printing (see below). |
 |
| Otherwise, it is sufficient to run VertiGIS Printing. In the image below you can see the result (preview) after the printing process for operating mode (C). |
 |
| In the image below, you can see the print result for operation mode (B) "Only those objects of the data source that are located in the current WebOffice map section are listed." |
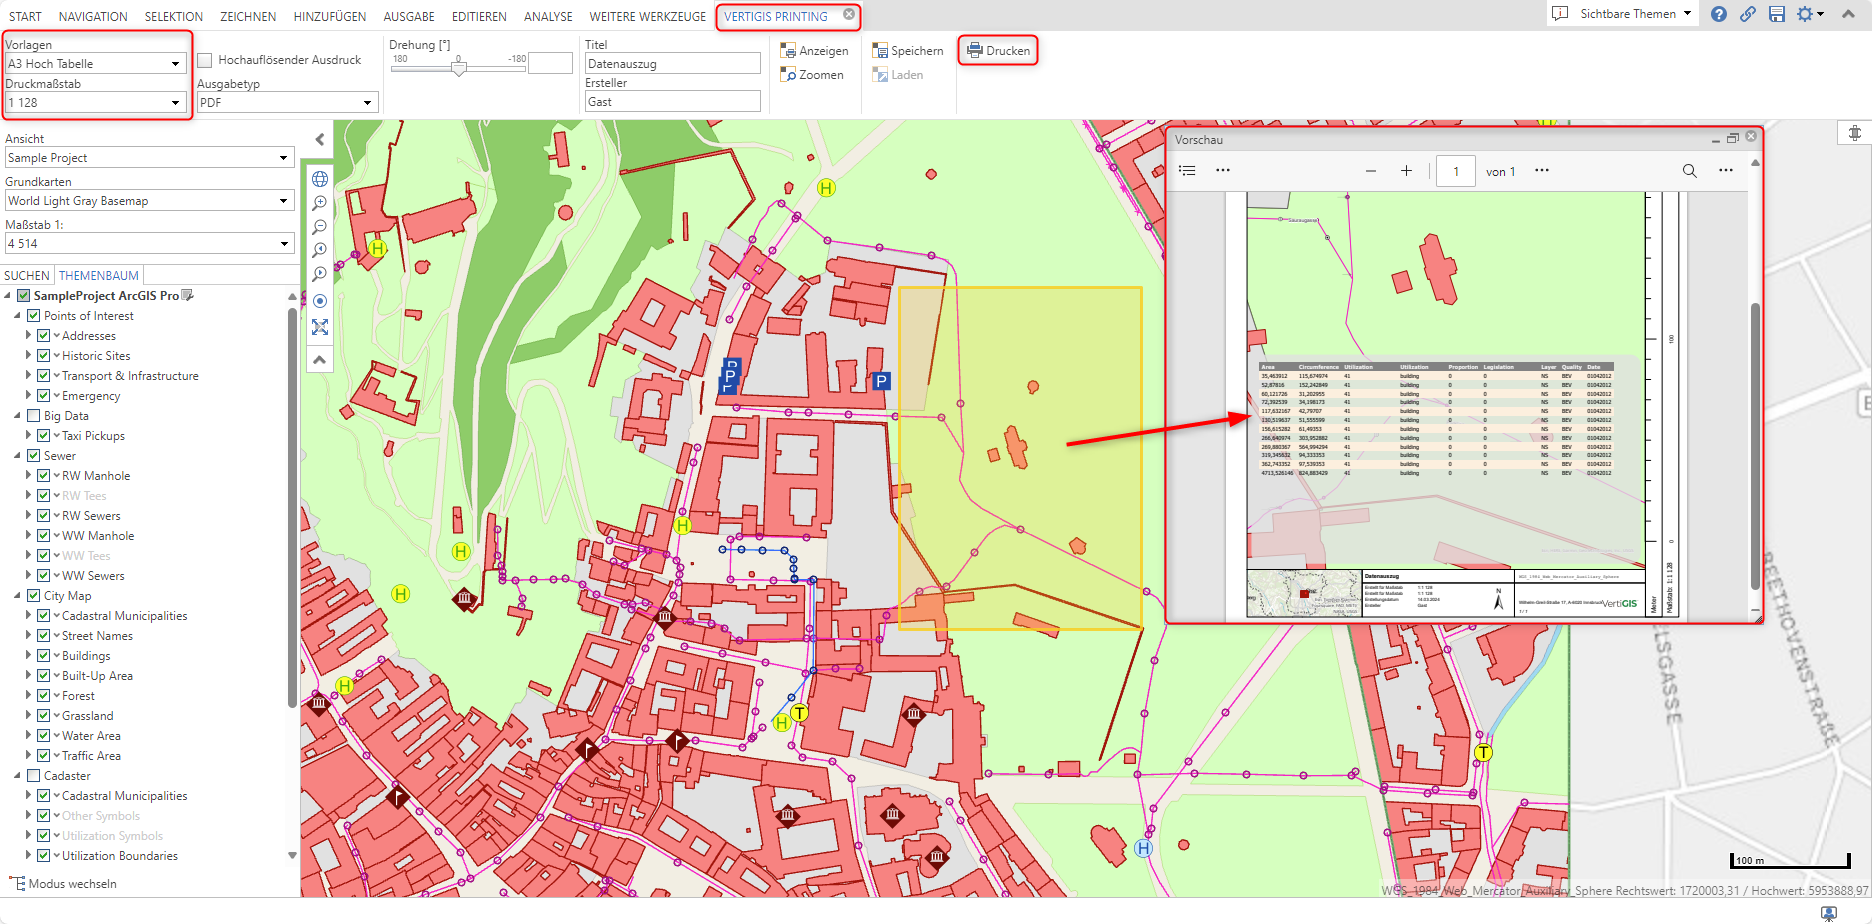 |
|
For more information about VertiGIS Printing, see the following chapter in the WebOffice main documentation: VertiGIS Studio Printing Engine |